
Multi Cluster View with OCM
View clusters from OCM's MultiClusterHub and MultiCluster Engine in Backstage.
Open Cluster Management plugin for Backstage
The Open Cluster Management (OCM) plugin integrates your Backstage instance with the MultiClusterHub and MultiCluster engines of OCM.
Capabilities
The OCM plugin has the following capabilities:
- All clusters represented as
ManagedClusterinMultiClusterHubor MCE are discovered and imported into the Backstage catalog, such as:- Entity is defined as
kind: Resourcewithspec.typeset tokubernetes-cluster. - Links to the OpenShift Container Platform (OCP) console, OCM console, and OpenShift Cluster Manager are provided in
metadata.links.
- Entity is defined as
- Shows real-time data from OCM on the Resource entity page, including:
- Cluster current status (up or down)
- Cluster nodes status (up or down)
- Cluster details (console link, OCP, and Kubernetes version)
- Details about available compute resources on the cluster
For administrators
Installation
The OCM plugin is composed of two packages, including:
@janus-idp/backstage-plugin-ocm-backendpackage connects the Backstage server to OCM. For setup process, see Backend Setup- The
@janus-idp/backstage-plugin-ocmpackage, which contains frontend components requires the\*-backendpackage to be present and properly set up. For detailed instructions on setting up the backend, refer to the Backend Setup section.
NOTE
If you are interested in Resource discovery and do not want any of the front-end components, then you can install and configure the @janus-idp/backstage-plugin-ocm-backend package only.
Prerequisites
-
OCM is deployed and configured on a Kubernetes cluster.
-
Kubernetes plugin for Backstage is installed and configured (Optional)
-
On the target Hub clusters please create a
ServiceAccountand grant it the followingClusterRole:kind: ClusterRole
apiVersion: rbac.authorization.k8s.io/v1
metadata:
name: backstage-ocm-plugin
rules:
- apiGroups:
- cluster.open-cluster-management.io
resources:
- managedclusters
verbs:
- get
- watch
- list
- apiGroups:
- internal.open-cluster-management.io
resources:
- managedclusterinfos
verbs:
- get
- watch
- list
Setting up the OCM backend package
-
Install the OCM backend plugin using the following command:
yarn workspace backend add @janus-idp/backstage-plugin-ocm-backend -
Configure the OCM backend plugin using one of the following configurations:
-
The OCM configuration provides the information about your hub. To use the OCM configuration, add the following code to your
app-config.yamlfile:app-config.yamlcatalog:
providers:
ocm:
env: # Key is reflected as provider ID. Defines and claims plugin instance ownership of entities
name: # Name that the hub cluster will assume in Backstage Catalog (in OCM this is always local-cluster which can be confusing)
url: # URL of the hub cluster API endpoint
serviceAccountToken: # Token used for querying data from the hub
skipTLSVerify: # Skip TLS certificate verification, defaults to false (Optional)
caData: # Base64-encoded CA bundle in PEM format (Optional)- To ensure the Hub clusters are properly ingested into the catalog, the value provided to the
namefield must comply with the backstage entity name format requirements
- To ensure the Hub clusters are properly ingested into the catalog, the value provided to the
-
Alternatively, If the Backstage Kubernetes plugin is installed and configured to connect to the Hub cluster, then you can bind the both hub and Kubernetes configuration by providing the name of the Hub in the
app-config.yamlas follows:app-config.yamlkubernetes:
serviceLocatorMethod:
type: 'multiTenant'
clusterLocatorMethods:
- type: 'config'
clusters:
- name: <cluster-name>
# Other cluster configurations
url: <cluster-api-url>
serviceAccountToken: <token>
skipTLSVerify: # Skip TLS certificate verification, defaults to false (Optional)
caData: # Base64-encoded CA bundle in PEM format (Optional)
catalog:
providers:
ocm:
env: # Key is reflected as provider ID. Defines and claims plugin instance ownership of entities
kubernetesPluginRef: <cluster-name> # Match the cluster name in kubernetes plugin config
# The remaining OCM configurations are ignored if kubernetesPluginRef is provided (with exception of schedule and owner)
# ... Other OCM Configurations- If the
kubernetesPluginRefis provided, then it will take precedence over any other configuration for that OCM provider - Please ensure that
<cluster-name>follows the same requirements as thenamefield in the OCM configuration. - Note: It is not necessary to have the kubernetes plugin installed, since only the kubernetes configuration is required if
kubernetesPluginRefis used
Ensure that the Backstage uses a
ServiceAccounttoken and the required permissions are granted as mentioned previously.This is useful when you already use a Kubernetes plugin in your Backstage instance. Also, the hub cluster must be connected using the
ServiceAccount.For more information about the configuration, see Backstage Kubernetes plugin documentation.
- If the
-
-
Optional: Configure the default owner for the cluster entities in the catalog for a specific environment. For example, use the following code to set
fooas the owner for clusters fromenvin theapp-config.yamlcatalog section:
catalog:
  providers:
    ocm:
      env:
        # ...
        owner: user:foo
For more information about the default owner configuration, see upstream string references documentation.
Installing the OCM backend package into the legacy backend
-
Create a new plugin instance in
packages/backend/src/plugins/ocm.tsfile as follows:packages/backend/src/plugins/ocm.tsimport { Router } from 'express';
import { createRouter } from '@janus-idp/backstage-plugin-ocm-backend';
import { PluginEnvironment } from '../types';
export default async function createPlugin(
env: PluginEnvironment,
): Promise<Router> {
return await createRouter({
logger: env.logger,
config: env.config,
permissions: env.permissions,
discovery: env.discovery,
});
} -
Import and plug the new instance into the
packages/backend/src/index.tsfile:packages/backend/src/index.tsimport ocm from './plugins/ocm';
async function main() {
// ...
const createEnv = makeCreateEnv(config);
// ...
const ocmEnv = useHotMemoize(module, () => createEnv('ocm'));
// ...
const apiRouter = Router();
// ...
apiRouter.use('/ocm', await ocm(ocmEnv));
// ...
} -
Import the cluster
Resourceentity provider into thecatalogplugin in thepackages/backend/src/plugins/catalog.tsfile. The scheduler also needs to be configured. Two configurations are possible here:-
Method 1: If the scheduler is configured inside the
app-config.yamlusing the schedule config key as follows:app-config.yamlcatalog:
providers:
ocm:
env:
# ...
schedule: # optional; same options as in TaskScheduleDefinition
# supports cron, ISO duration, "human duration" as used in code
frequency: { minutes: 1 } # Customize with your desired frequency
# supports ISO duration, "human duration" as used in code
timeout: { minutes: 1 } # Customize with your desired timeoutThen use the configured scheduler by adding the following to the
packages/backend/src/plugins/catalog.ts:packages/backend/src/plugins/catalog.tsimport { ManagedClusterProvider } from '@janus-idp/backstage-plugin-ocm-backend';
export default async function createPlugin(
env: PluginEnvironment,
): Promise<Router> {
const builder = await CatalogBuilder.create(env);
// ...
const ocm = ManagedClusterProvider.fromConfig(env.config, {
logger: env.logger,
scheduler: env.scheduler,
});
builder.addEntityProvider(ocm);
// ...
}
NOTE
If you have made any changes to the schedule in the
app-config.yamlfile, then restart to apply the changes.
-
Method 2: Add a schedule directly inside the
packages/backend/src/plugins/catalog.tsfile:packages/backend/src/plugins/catalog.tsimport { ManagedClusterProvider } from '@janus-idp/backstage-plugin-ocm-backend';
export default async function createPlugin(
env: PluginEnvironment,
): Promise<Router> {
const builder = await CatalogBuilder.create(env);
// ...
const ocm = ManagedClusterProvider.fromConfig(env.config, {
logger: env.logger,
schedule: env.scheduler.createScheduledTaskRunner({
frequency: { minutes: 1 },
timeout: { minutes: 1 },
}),
});
builder.addEntityProvider(ocm);
// ...
}
NOTE
If both the
schedule(hard-coded schedule) andscheduler(app-config.yamlschedule) option are provided in thepackages/backend/src/plugins/catalog.ts, thescheduleroption takes precedence. However, if the schedule inside theapp-config.yamlfile is not configured, then thescheduleoption is used.
-
Installing the OCM backend package into the new backend
The OCM plugin supports integration with the new backend system. In order to install the plugin follow the first 2 configuration steps described here. Then add the following lines to the packages/backend/src/index.ts file.
import {
catalogModuleOCMEntityProvider,
ocmPlugin,
} from '@janus-idp/backstage-plugin-ocm-backend/alpha';
const backend = createBackend();
backend.add(catalogModuleOCMEntityProvider);
backend.add(ocmPlugin);
backend.start();
NOTE
The default schedule for the OCM plugin has a frequency of 1 hour and a timeout of 15 minutes. If you want to modify the schedule, you can do so by specifying the schedule field in the app-config.yaml file as follows:
catalog:
  providers:
    ocm:
      env:
        # ...
        schedule: # optional; same options as in TaskScheduleDefinition
          # supports cron, ISO duration, "human duration" as used in code
          frequency: { minutes: 1 } # Customize with your desired frequency
          # supports ISO duration, "human duration" as used in code
          timeout: { minutes: 1 } # Customize with your desired timeout
Setting up the OCM frontend package
-
Install the OCM frontend plugin using the following command:
yarn workspace app add @janus-idp/backstage-plugin-ocm -
Select the components that you want to use, such as:
-
OcmPage: This is a standalone page or dashboard displaying all clusters as tiles. You can addOcmPagetopackages/app/src/App.tsxfile as follows:packages/app/src/App.tsximport { OcmPage } from '@janus-idp/backstage-plugin-ocm';
const routes = (
<FlatRoutes>
{/* ... */}
<Route path="/ocm" element={<OcmPage logo={<Logo />} />} />
</FlatRoutes>
);You can also update navigation in
packages/app/src/components/Root/Root.tsxas follows:packages/app/src/components/Root/Root.tsximport StorageIcon from '@material-ui/icons/Storage';
export const Root = ({ children }: PropsWithChildren<{}>) => (
<SidebarPage>
<Sidebar>
<SidebarGroup label="Menu" icon={<MenuIcon />}>
{/* ... */}
<SidebarItem icon={StorageIcon} to="ocm" text="Clusters" />
</SidebarGroup>
{/* ... */}
</Sidebar>
{children}
</SidebarPage>
); -
ClusterContextProvider: This component is a React context provided for OCM data, which is related to the current entity. TheClusterContextProvidercomponent is used to display any data on the React components mentioned inpackages/app/src/components/catalog/EntityPage.tsx:packages/app/src/components/catalog/EntityPage.tsximport {
ClusterAvailableResourceCard,
ClusterContextProvider,
ClusterInfoCard,
} from '@janus-idp/backstage-plugin-ocm';
const isType = (types: string | string[]) => (entity: Entity) => {
if (!entity?.spec?.type) {
return false;
}
return typeof types === 'string'
? entity?.spec?.type === types
: types.includes(entity.spec.type as string);
};
export const resourcePage = (
<EntityLayout>
{/* ... */}
<EntityLayout.Route path="/status" title="status">
<EntitySwitch>
<EntitySwitch.Case if={isType('kubernetes-cluster')}>
<ClusterContextProvider>
<Grid container direction="column" xs={6}>
<Grid item>
<ClusterInfoCard />
</Grid>
<Grid item>
<ClusterAvailableResourceCard />
</Grid>
</Grid>
</ClusterContextProvider>
</EntitySwitch.Case>
</EntitySwitch>
</EntityLayout.Route>
</EntityLayout>
);
export const entityPage = (
<EntitySwitch>
{/* ... */}
<EntitySwitch.Case if={isKind('resource')} children={resourcePage} />
</EntitySwitch>
);In the previous codeblock, you can place the context provider into your
Resourceentity renderer, which is usually available inpackages/app/src/components/catalog/EntityPage.tsxor in an imported component. -
<ClusterInfoCard />: This is an entity component displaying details of a cluster in a table: -
<ClusterAvailableResourceCard />: This is an entity component displaying the available resources on a cluster. For example, see.status.capacityof theManagedClusterresource.
-
For users
Using the OCM plugin in Backstage
The OCM plugin integrates your Backstage instance with multi-cluster engines and displays real-time data from OCM.
Prerequisites
- Your Backstage application is installed and running.
- You have installed the OCM plugin. For the installation process, see Installation.
- If RBAC permission framework is enabled, ensure adding the following permission policies in an external permission policies configuration file named
rbac-policy.csvto allow the rbac admins or your desired user(s)/group(s) to access the ocm backend plugin:
p, role:default/rbac_admin, ocm.entity.read, read, allow
p, role:default/rbac_admin, ocm.cluster.read, read, allow
Procedure
-
Open your Backstage application.
-
Click the Clusters tab from the left-side panel to view the Managed Clusters page.
The Managed Clusters page displays the list of clusters with additional information, such as status, infrastructure provider, associated OpenShift version, and available nodes.
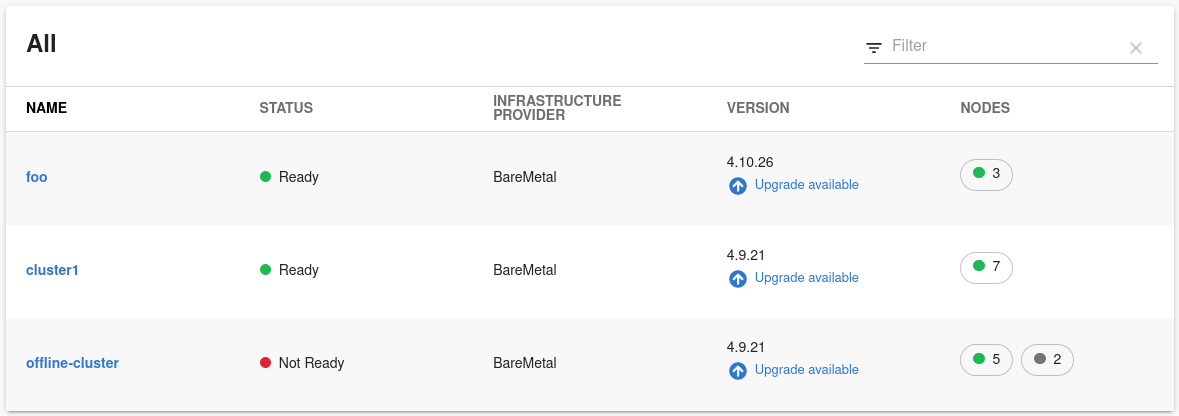
You can also upgrade the OpenShift version for a cluster using the Upgrade available option in the VERSION column.
-
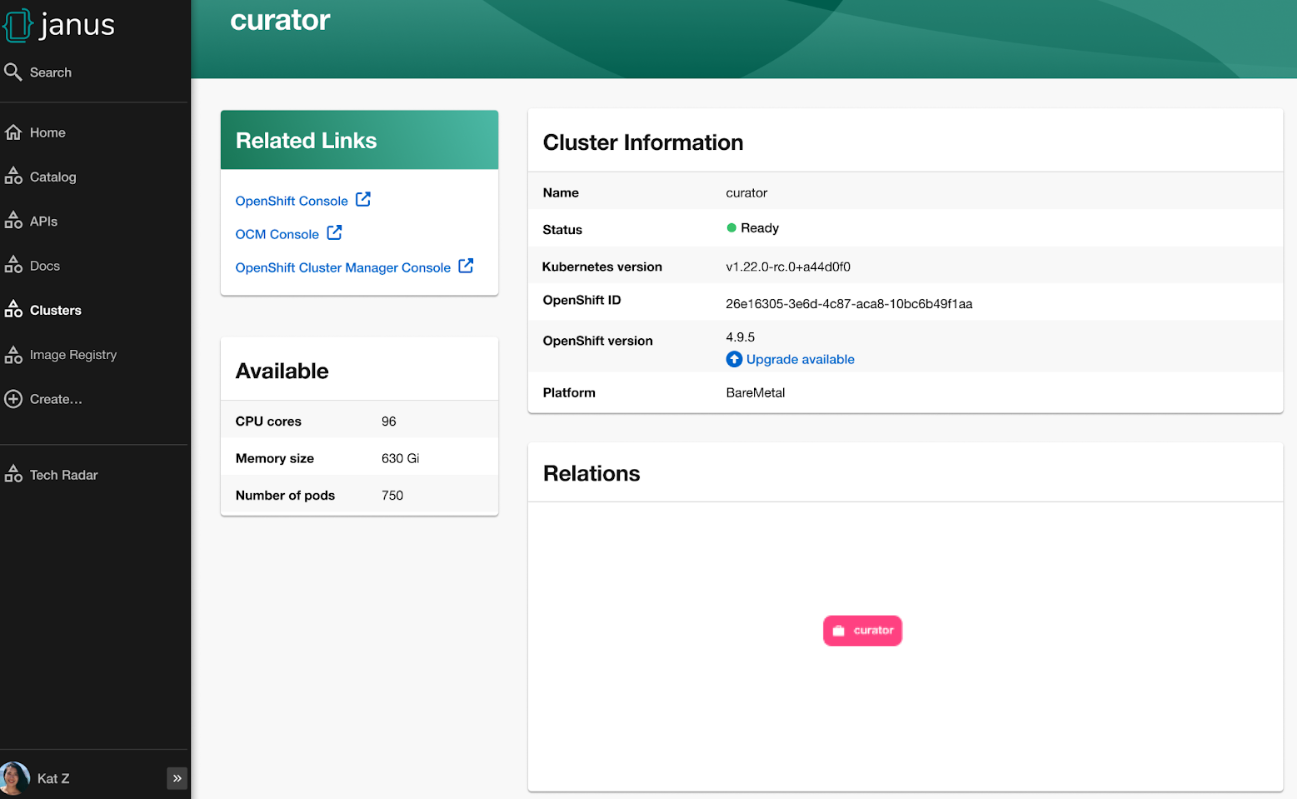
Select a cluster from the Managed Clusters to view the related cluster information.
You are redirected to the cluster-specific page, which consists of:
-
Cluster Information, such as name, status, accessed Kubernetes version, associated OpenShift ID and version, and accessed platform.
-
Available cluster capacity, including CPU cores, memory size, and number of pods.
-
Related Links, which enable you to access different consoles directly, such as OpenShift Console, OCM Console, and OpenShift Cluster Manager Console.
-
Relations card, which displays the visual representation of the cluster and associated dependencies.
-