
Application Topology for Kubernetes
Visualize the deployment status and related resources of your applications deployed on any Kubernetes cluster.
Topology plugin for Backstage
The Topology plugin enables you to visualize the workloads such as Deployment, Job, Daemonset, Statefulset, CronJob, and Pods powering any service on the Kubernetes cluster.
For administrators
Installation
Prerequisites
- The Kubernetes plugins including
@backstage/plugin-kubernetesand@backstage/plugin-kubernetes-backendare installed and configured by following the installation and configuration guides. - The Kubernetes plugin is configured and connects to the cluster using a
ServiceAccount. - The
ClusterRolemust be granted toServiceAccountaccessing the cluster. If you have the Backstage Kubernetes plugin configured, then theClusterRoleis already granted.
Tip: You can use the prepared manifest for a read-only
ClusterRole, providing access for both Kubernetes plugin and Topology plugin.
Other configurations
To view the OpenShift routes
-
Ensure that read access is granted to the
routesresource in theClusterRole. You can use the following code to do so:apiVersion: rbac.authorization.k8s.io/v1
kind: ClusterRole
metadata:
name: backstage-read-only
rules:
...
- apiGroups:
- route.openshift.io
resources:
- routes
verbs:
- get
- list -
The following must be added in
kubernetes.customResourcesproperty in theapp-config.yamlfile to view the OpenShift route as well:kubernetes:
...
customResources:
- group: 'route.openshift.io'
apiVersion: 'v1'
plural: 'routes'
To view the pods/pods log
The following permission must be granted to the ClusterRole to be able to view the pod logs:
  apiVersion: rbac.authorization.k8s.io/v1
  kind: ClusterRole
  metadata:
    name: backstage-read-only
  rules:
    ...
    - apiGroups:
        - ''
      resources:
        - pods
        - pods/log
      verbs:
        - get
        - list
        - watch
To view the Tekton PipelineRuns
-
Ensure that read access is granted to the Pipelines, PipelineRuns, and TaskRuns resource in the
ClusterRole. You can use the following code to do so:...
apiVersion: rbac.authorization.k8s.io/v1
kind: ClusterRole
metadata:
name: backstage-read-only
rules:
...
- apiGroups:
- tekton.dev
resources:
- pipelines
- pipelineruns
- taskruns
verbs:
- get
- list -
The following code must be added to the
kubernets.customResourcesproperty in theapp-config.yamlfile to view the Tekton PipelineRuns list in the side panel and to view the latest PipelineRun status in the Topology node decorator:kubernetes:
...
customResources:
- group: 'tekton.dev'
apiVersion: 'v1'
plural: 'pipelines'
- group: 'tekton.dev'
apiVersion: 'v1'
plural: 'pipelineruns'
- group: 'tekton.dev'
apiVersion: 'v1'
plural: 'taskruns'
To enable the Source Code Editor
-
Ensure that read access is granted to the
CheClustersresource in theClusterRoleas shown in the following example code:...
apiVersion: rbac.authorization.k8s.io/v1
kind: ClusterRole
metadata:
name: backstage-read-only
rules:
...
- apiGroups:
- org.eclipse.che
resources:
- checlusters
verbs:
- get
- list -
The following configuration must be added in the
kubernetes.customResourcesproperty in theapp-config.yamlfile to use the Source Code Editor:kubernetes:
...
customResources:
- group: 'org.eclipse.che'
apiVersion: 'v2'
plural: 'checlusters'
Labels and annotations
Link to the source code editor or the source
The following annotations are added to workload resources, such as Deployments to navigate to the Git repository of the associated application using the source code editor:
annotations:
  app.openshift.io/vcs-uri: <GIT_REPO_URL>
You can also add the following annotation to navigate to a specific branch:
annotations:
  app.openshift.io/vcs-ref: <GIT_REPO_BRANCH>
Note: If Red Hat OpenShift Dev Spaces is installed and configured and git URL annotations are also added to the workload YAML file, then clicking on the edit code decorator redirects you to the Red Hat OpenShift Dev Spaces instance.
Note: When you deploy your application using the OCP Git import flows, then you do not need to add the labels as import flows do that. Otherwise, you need to add the labels manually to the workload YAML file.
The labels are not similar to backstage.io/edit-url annotations as it points to the catalog entity metadata source file and is applied to Backstage catalog entity metadata YAML file, but not Kubernetes resources.
Tip: You can also add the
app.openshift.io/edit-urlannotation with the edit URL that you want to access using the decorator.
Entity annotation/label
-
In order for Backstage to detect that an entity has Kubernetes components, the following annotation should be added to the entity's
catalog-info.yaml:catalog-info.yamlannotations:
backstage.io/kubernetes-id: <BACKSTAGE_ENTITY_NAME> -
The following label is added to the resources so that the Kubernetes plugin gets the Kubernetes resources from the requested entity:
catalog-info.yamllabels:
backstage.io/kubernetes-id: <BACKSTAGE_ENTITY_NAME>`
NOTE
When using the label selector, the mentioned labels must be present on the resource.
Namespace annotation
You can also add the backstage.io/kubernetes-namespace annotation to identify the Kubernetes resources using the defined namespace.
annotations:
  backstage.io/kubernetes-namespace: <RESOURCE_NS>
The Red Hat OpenShift Dev Spaces instance is not accessible using the source code editor if the
backstage.io/kubernetes-namespaceannotation is added to thecatalog-info.yamlfile.
To retrieve the instance URL, CheCluster Custom Resource (CR) is required. The instance URL is not retrieved if the namespace annotation value is different from openshift-devspaces as CheCluster CR is created in openshift-devspaces namespace.
Label selector query annotation
You can write your own custom label, which Backstage uses to find the Kubernetes resources. The label selector takes precedence over the ID annotations.
annotations:
  backstage.io/kubernetes-label-selector: 'app=my-app,component=front-end'
If you have multiple entities while Red Hat Dev Spaces is configured and want multiple entities to support the edit code decorator that redirects to the Red Hat Dev Spaces instance, you can add the backstage.io/kubernetes-label-selector annotation to the catalog-info.yaml file for each entity.
annotations:
  backstage.io/kubernetes-label-selector: 'component in (<BACKSTAGE_ENTITY_NAME>,che)'
If you are using the above label selector, ensure that you add the below labels to your resources so that the Kubernetes plugin gets the Kubernetes resources from the requested entity:
labels:
  component: che # add this label to your che cluster instance
labels:
  component: <BACKSTAGE_ENTITY_NAME> # add this label to the other resources associated with your entity
You can also write your own custom query for the label selector with unique labels to differentiate your entities. However, you need to ensure that you add those labels to the resources associated with your entities including your CheCluster instance.
Icon displayed in the node
-
The following label is added to workload resources, such as Deployments to display runtime icon in the topology nodes:
deployment.yamllabels:
app.openshift.io/runtime: <RUNTIME_NAME> -
As another option, you can include the following label to display the runtime icon:
deployment.yamllabels:
app.kubernetes.io/name: <RUNTIME_NAME>Supported values of
<RUNTIME_NAME>include:- django
- dotnet
- drupal
- go-gopher
- golang
- grails
- jboss
- jruby
- js
- nginx
- nodejs
- openjdk
- perl
- phalcon
- php
- python
- quarkus
- rails
- redis
- rh-spring-boot
- rust
- java
- rh-openjdk
- ruby
- spring
- spring-boot
NOTE Other values result in icons not being rendered for the node.
App grouping
The following label is added to display the workload resources such as Deployments and Pods in a visual group:
labels:
  app.kubernetes.io/part-of: <GROUP_NAME>
Node connector
The following annotation is added to display the workload resources such as Deployments and Pods with a visual connector:
annotations:
  app.openshift.io/connects-to: '[{"apiVersion": <RESOURCE_APIVERSION>,"kind": <RESOURCE_KIND>,"name": <RESOURCE_NAME>}]'
For more information about the labels and annotations, see Guidelines for labels and annotations for OpenShift applications.
Procedure
-
Install the Topology plugin using the following command:
yarn workspace app add @janus-idp/backstage-plugin-topology -
Enable TOPOLOGY tab in
packages/app/src/components/catalog/EntityPage.tsx:packages/app/src/components/catalog/EntityPage.tsximport { TopologyPage } from '@janus-idp/backstage-plugin-topology';
const serviceEntityPage = (
<EntityLayout>
{/* ... */}
<EntityLayout.Route path="/topology" title="Topology">
<TopologyPage />
</EntityLayout.Route>
</EntityLayout>
);
For users
Using the Topology plugin in Backstage
Topology is a front-end plugin that enables you to view the workloads as nodes that power any service on the Kubernetes cluster.
Prerequisites
- Your Backstage application is installed and running.
- You have installed the Topology plugin. For the installation process, see Installation.
Procedure
-
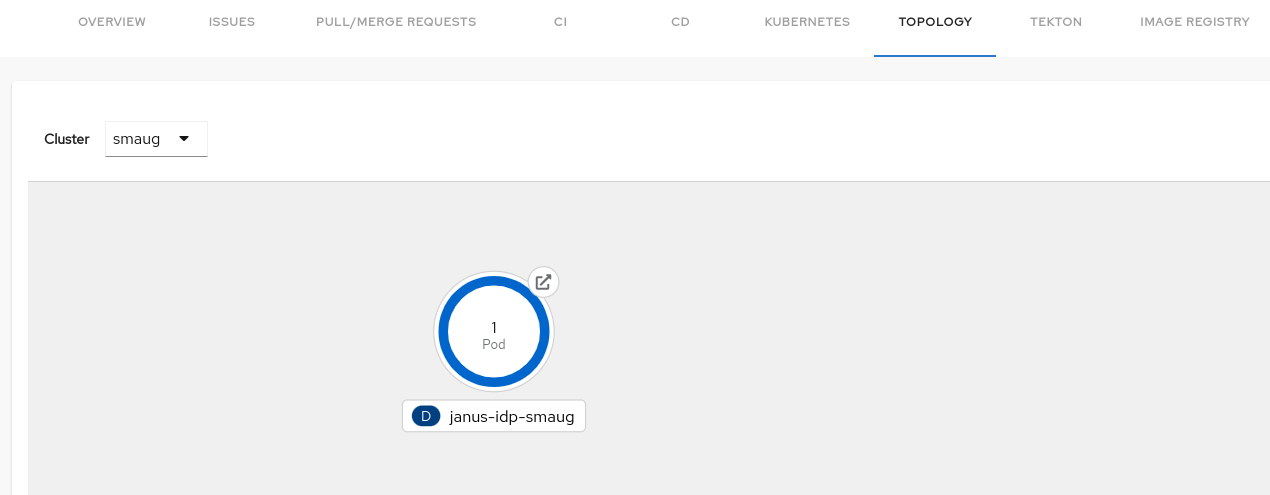
Open your Backstage application and select a component from the Catalog page.
-
Go to the TOPOLOGY tab and you can view the workloads such as Deployments, Pods as nodes.
-
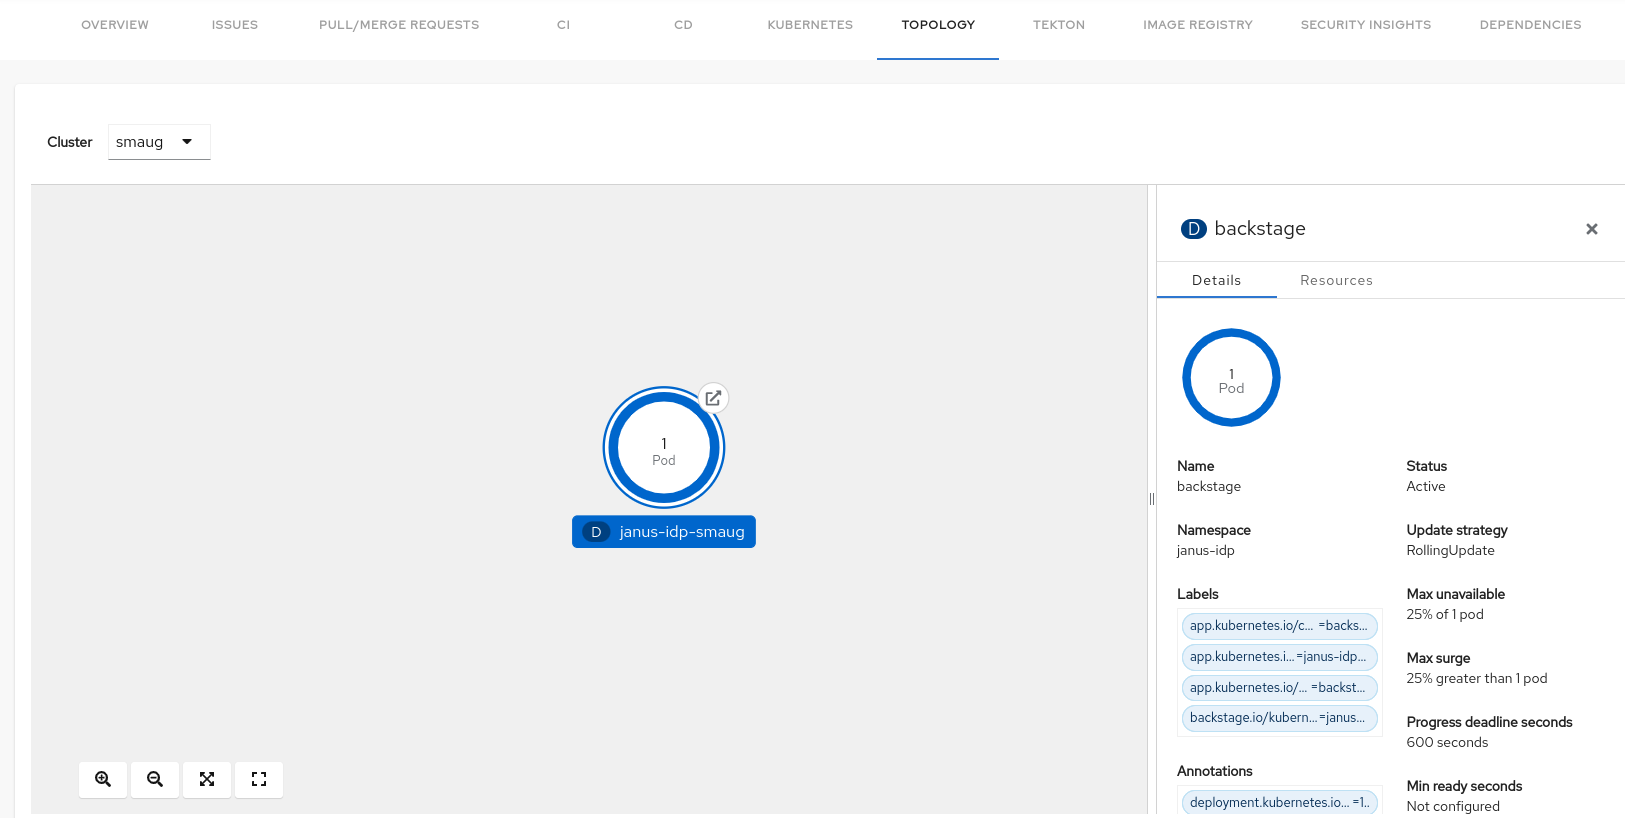
Select a node and a pop-up appears on the right side, which contains two tabs: Details and Resources.
The Details and Resources tab contain the associated information and resources of the node.
-
Click on the Open URL button on the top of a node.
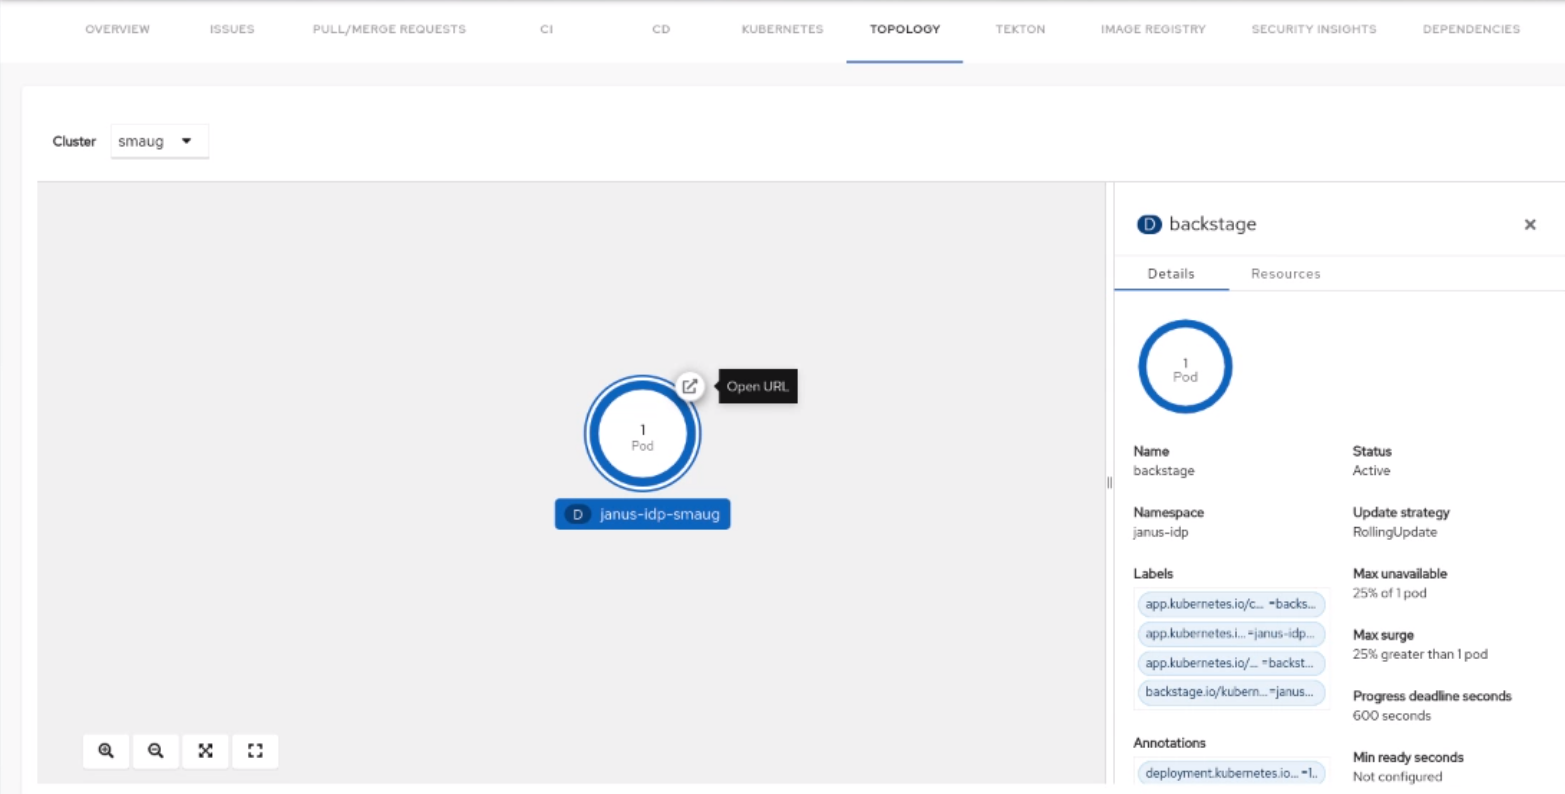
When you click on the open URL button, it allows you to access the associated Ingresses and runs your application in a new tab.