Recommended Approach to Configuring TechDocs for Backstage on OpenShift
Backstage includes a built-in techdocs builder that can be used to generate static HTML documentation from your codebase. However, the default basic setup of the "local" builder is not intended for production. This is because the local builder requires that you have a running instance of Backstage and the techdocs plugin installed on your local machine, as well as the use of local storage.
In this blog post, we will show you the recommended approach to streamlining the configuration of TechDocs for Backstage on OpenShift. We will show you how to set up a fully-automated process for building and publishing techdocs using GitHub Actions and the OpenShift Data Foundations operator. This will allow you to create an ObjectBucketClaim that mimics an AWS S3 Bucket, which can then be used to store and serve your techdocs.
OpenShift Data Foundation (ODF) Installation
The TechDocs publisher stores generated files in Cloud Storage (Google GCS, AWS S3, Azure Blob Storage) or local storage. OpenShift Data Foundations (ODF) provides a custom resource called the ObjectBucketClaim, which can be used to request an S3 compatible bucket backend. To use this feature, you must install the ODF operator.
We can install this using the OperatorHub from the OpenShift Web Console
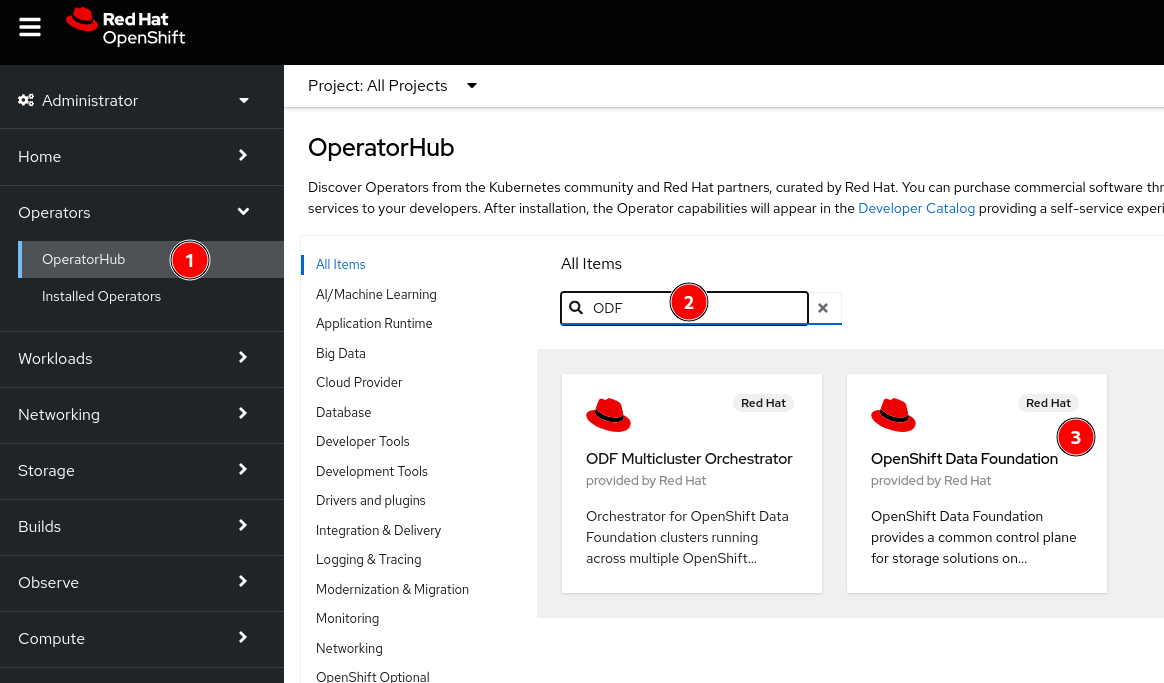
- Navigate to the Operators -> OperatorHub menu
- Type
ODFin the Filter by keyword... box - Select the
OpenShift Data Foundationoperator and then select Install
Keep the default settings as shown below:

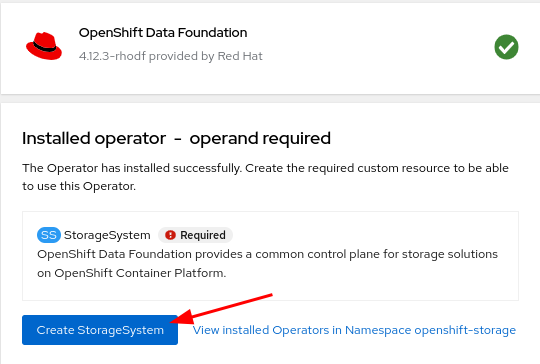
Click Install.
The operator can take several minutes to complete.
Once complete click the Create StorageSystem button.
If the Create StorageSystem screen does not look like the screenshot below, wait a few minutes for the operator pods to start running. You can check the status of the pods in the openshift-storage namespace and wait for them to change to a Running state.
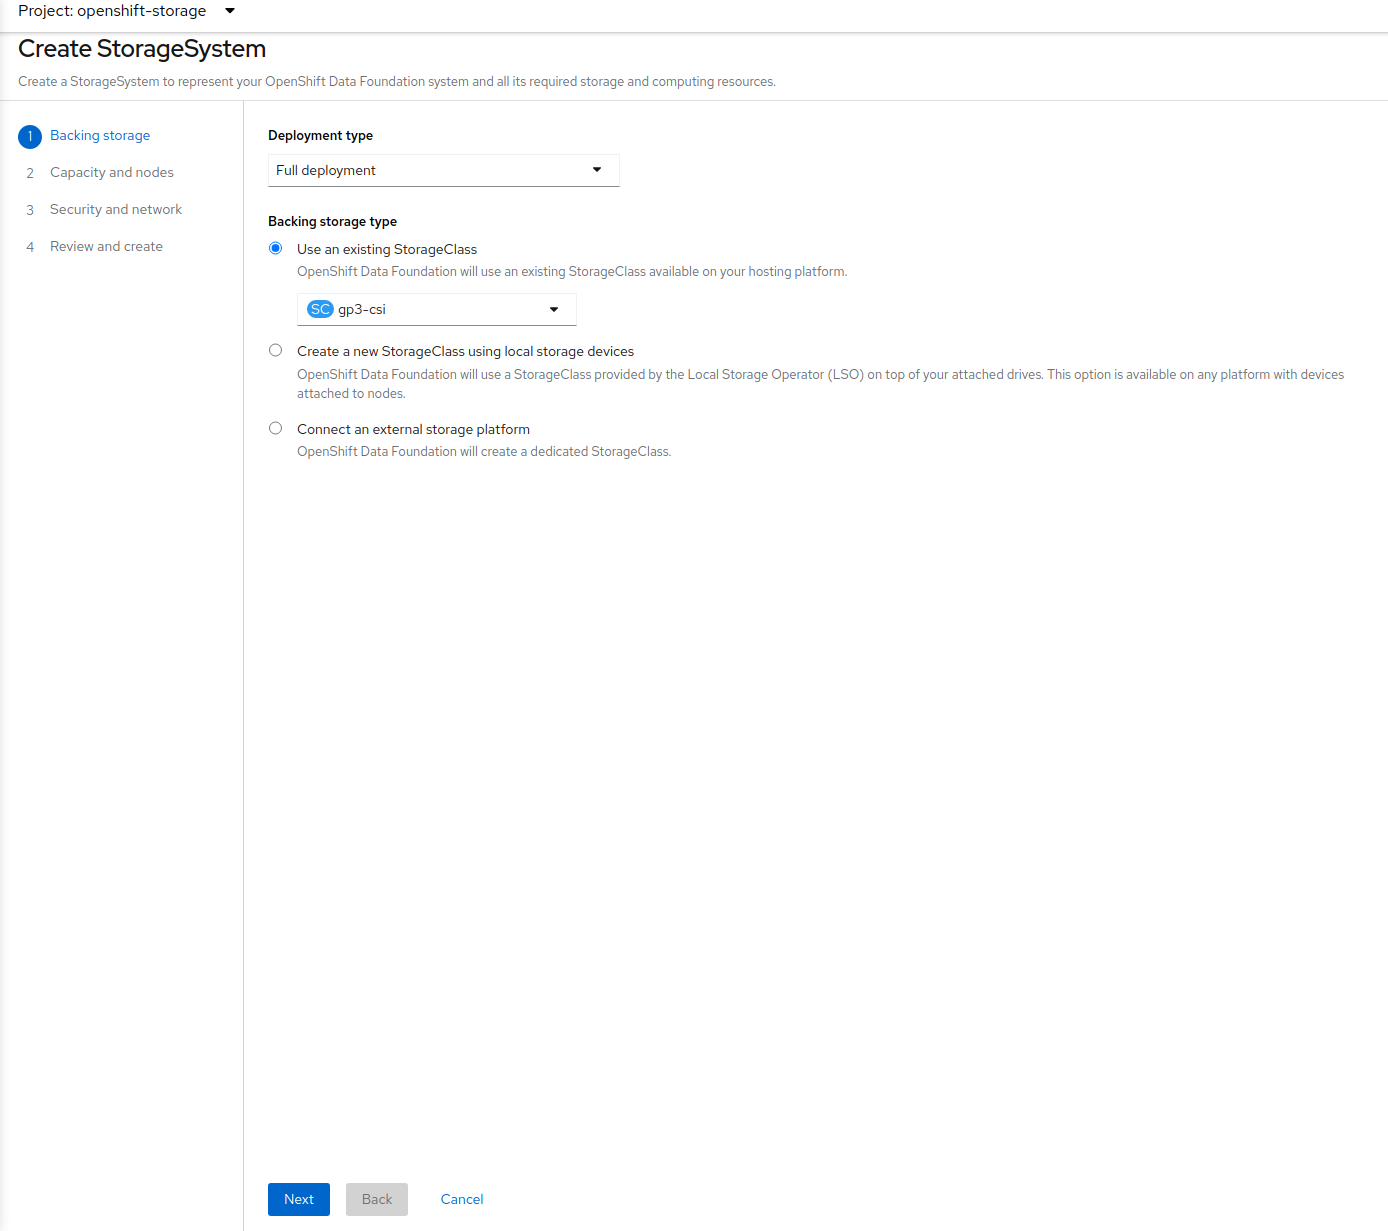
Take all the default settings. When you reach the Capacity and nodes section make sure to select at least 3 nodes, preferably in 3 different zones.
ObjectBucketClaim Creation
Once the StorageSystem is complete use the following yaml to create an ObjectBucketClaim in the same namespace Janus is installed:
apiVersion: objectbucket.io/v1alpha1
kind: ObjectBucketClaim
metadata:
  name: backstage-bucket-claim
spec:
  generateBucketName: backstage-bucket-
  storageClassName: openshift-storage.noobaa.io
It may take a few minutes after the StorageSystem is complete in order for the OBC to be fully created. If the status of the OBC is Lost just wait a few minutes.
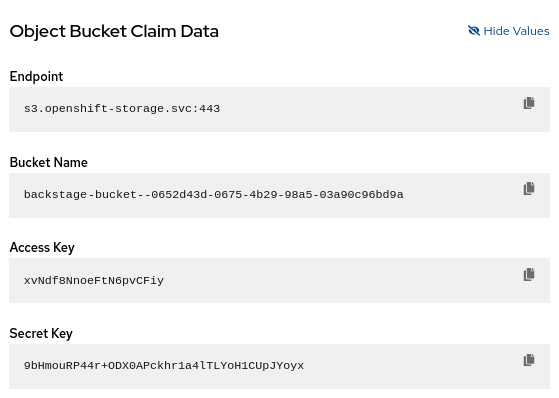
Once you have completed the steps, your ObjectBucketClaim will be ready for use. You can confirm this by checking the Claim Data section as seen below from the OpenShift Web Console.
Configuring Backstage
Once the ODF Operator is installed and an ObjectBucketClaim is created, Backstage can be configured to use the ObjectBucketClaim as the TechDocs publisher.
Deployment
Update the Backstage Deployment to include the following:
envFrom:
  - configMapRef:
      name: backstage-bucket-claim
  - secretRef:
      name: backstage-bucket-claim
env:
  - name: BUCKET_URL
    value: 'VALUE_OF_S3_ROUTE_LOCATION'
  - name: AWS_REGION
    valueFrom:
      configMapKeyRef:
        name: backstage-bucket-claim
        key: BUCKET_REGION
Both a Secret and a ConfigMap are created with the same name and include information that Backstage needs to connect to the ObjectBucketClaim in order to read the TechDoc files.
The VALUE_OF_S3_ROUTE_LOCATION variable above will need to be replaced. To do this, run the following command and replace with the output:
oc get route s3 -n openshift-storage -o jsonpath='https://{.spec.host}'
The AWS Region is empty in this case because we are using OpenShift Data Foundation (ODF). Backstage will fail to start if we set this value to an empty string. By default, Backstage will look for an environment variable named AWS_REGION if no region is specified in the app-config.yaml file. This is why we are not setting this value in the app-config.yaml and setting the AWS_REGION from the ConfigMap instead.
Application Configuration
Update the app-config.yaml file to look like the following:
techdocs:
  builder: 'external'
  generator:
    runIn: 'local'
  publisher:
    type: 'awsS3'
    awsS3:
      bucketName: ${BUCKET_NAME}
      endpoint: ${BUCKET_URL}
      s3ForcePathStyle: true
      credentials:
        accessKeyId: ${AWS_ACCESS_KEY_ID}
        secretAccessKey: ${AWS_SECRET_ACCESS_KEY}
If you are using Janus Backstage Showcase image, you will also need add the following to the app-config.yaml file:
enabled:
  techdocs: true
TechDocs Builder
To generate the static files that will be published to our ObjectBucketClaim, we will need to set up a builder that utilizes the techdocs-cli. We can do this by creating a GitHub Action similar to the one found below. As you can see, this will run anytime the mkdocs.yaml file is modified or any file in the docs folder is modified. This will regenerate the static content, so that users always have access to the latest documentation.
name: Publish TechDocs Site

on:
  push:
    branches:
      - main
    paths:
      - 'docs/**'
      - 'mkdocs.yaml'

jobs:
  publish-techdocs-site:
    name: Publish techdocs site
    runs-on: ubuntu-latest

    env:
      TECHDOCS_S3_BUCKET_NAME: ${{ secrets.BUCKET_NAME }}
      AWS_ACCESS_KEY_ID: ${{ secrets.AWS_ACCESS_KEY_ID }}
      AWS_SECRET_ACCESS_KEY: ${{ secrets.AWS_SECRET_ACCESS_KEY }}
      AWS_REGION: ${{ secrets.AWS_REGION }}
      AWS_ENDPOINT: ${{ secrets.AWS_ENDPOINT }}
      ENTITY_NAMESPACE: 'default'
      ENTITY_KIND: 'Component'
      ENTITY_NAME: 'BACKSTAGE_COMPONENT_NAME'

    steps:
      - name: Checkout code
        uses: actions/checkout@v3
        with:
          fetch-depth: 0

      - name: Setup Node
        uses: actions/setup-node@v3
        with:
          node-version-file: '.nvmrc'
          cache: 'yarn'

      - name: Setup Python
        uses: actions/setup-python@v4
        with:
          python-version: '3.9'

      - name: Install techdocs-cli
        run: sudo npm install -g @techdocs/cli

      - name: Install mkdocs and mkdocs plugins
        run: python -m pip install mkdocs-techdocs-core==1.*

      - name: Generate docs site
        run: techdocs-cli generate --no-docker --verbose

      - name: Publish docs site
        run: techdocs-cli publish --publisher-type awsS3 --storage-name $TECHDOCS_S3_BUCKET_NAME --awsEndpoint $AWS_ENDPOINT --awsS3ForcePathStyle --entity $ENTITY_NAMESPACE/$ENTITY_KIND/$ENTITY_NAME
Replace BACKSTAGE_COMPONENT_NAME with the name of the Backstage component
Although the default basic setup of the "local" builder in Backstage is a valuable starting point for development and testing, it is crucial to transition to an external builder and utilize a Cloud Storage provider to create a resilient and scalable solution for production environments. By doing so, we can guarantee optimal performance, reliability, and streamlined management of documentation within Backstage.
Resources
- Complete ODF Operator configuration and installation
- Backstage.io TechDocs documentation
- Deploying Backstage onto OpenShift Using Helm
- Janus Backstage Images