
· 8 min read
Andrew Block

Backstage is a framework for building developer portals and has become an important tool that is complementary with establishing an Internal Developer Platform (IDP). Many of the same organizations who are seeking the benefits that Backstage and an IDP can provide are also using Kubernetes as a platform for building and running containerized workloads. As described within previous articles (Part 1, Part 2, the Backstage Helm chart can be used to not only simplify the process for deploying Backstage to Kubernetes, but also how its flexibility can adapt to a variety of conditions and constraints.

While Kubernetes has become the de-facto container orchestration platform, there are a number of Kubernetes distributions on the market. The Janus Project is an upstream community sponsored by Red Hat and OpenShift (along with the upstream OKD) is their Kubernetes distribution. The features and capabilities that are included within OpenShift greatly benefit from a framework like Backstage as it enables end users the ability to simplify their interactions with each of these services. This article will describe the considerations that must be accounted for and the process to deploy the Backstage Helm chart to OpenShift.

OpenShift Environment Considerations

As with any target environment, there are a variety of considerations that must be accounted for in order to ensure an integration is successful -- OpenShift is no different and the following are the areas that must be addressed prior to deploying the Helm chart:

  • Image Source and Content
  • Ingress Strategy
  • Security

Fortunately, as described in the prior articles, the Backstage Helm chart provides the necessary options to customize the deployment to suit the necessary requirements. These customizations are managed via Helm values and the following sections describe the significance of these areas as well as how they can be accomplished within the Backstage Helm chart.

Image Source and Content

OpenShift encompasses an entire container platform that is built upon certified and vetted content. The majority of this content is sourced from one of the Red Hat managed container registries and include everything from the foundational platform services to content designed for application developers. Previously, it was described how the PostgreSQL instance supporting the persistence of Backstage was customized to make use of a PostgreSQL image from Software Collections instead of from Bitnami.

Using a similar approach, the PostgreSQL instance that is leveraged as part of the Backstage Helm chart can be configured to make use of an image from the Red Hat Container Catalog (RHCC) to provide a greater level of security and assurance. Since the official supported image from Red Hat is the downstream of the PostgreSQL from Software Collections, the only configuration that needs to be modified is the source location as shown below:

postgresql:
image:
registry: registry.redhat.io
repository: rhel9/postgresql-13
tag: 1-73

Images originating from Red Hat container registries can be deployed to environments other than OpenShift. However, additional configurations with regards to how to enable access to the image content needs to be applied as standard Kubernetes environments do not include the Global Pull Secret which include the credentials for accessing the image source. The steps for enabling this functionality is beyond the scope of this article, but the Backstage Helm chart does support this capability.

Ingress Strategy

Exposing applications externally for the purpose of enabling access from end users or systems is a common concern when operating in a Kubernetes environment. OpenShift saw the need for this feature from the beginning of the Kubernetes based distribution of the platform and has included a component called Routes to enable this capability. Since then, the Kubernetes community has introduced a similar concept called Ingress which similarly provides support for exposing applications externally.

Given the wide adoption of Ingress in the Kubernetes community, and to provide OpenShift users with the freedom to choose from the existing Routes approach or the more Kubernetes native Ingress feature, support was added in OpenShift to “upconvert” any Ingress resource that is deployed within OpenShift to an OpenShift native Route resources. This provides the best of both worlds by giving end users the flexibility to choose the approach for which they feel the most comfortable with. In addition, the up-conversion can be customized to enable Route specific features, such as specifying the TLS termination type when exposing Ingress resources in a secure fashion. The feature can be enabled by specifying the route.openshift.io/termination on the Ingress object itself and supports edge, passthrough and termination types.

For simplicity in this implementation so that TLS is offloaded at the OpenShift router, edge termination can be specified by setting the following within the Backstage Helm Values file:

ingress:
enabled: true
annotations:
route.openshift.io/termination: "edge"

By setting this annotation, the resulting Route resource in OpenShift will be configured as a secure route with edge termination so that connections to the Backstage dashboard are secure.

Security

One of the most important aspects of OpenShift is its “secure by default” approach for managing the platform and all of the workloads. By default, OpenShift approaches security by enforcing that workloads conform to certain criteria including not running with elevated permissions (specifically as the root user) as well as not requesting access to privileged resources, such as file systems on each container host. This posture is inverse to a standard deployment of Kubernetes which does not require such considerations to be placed upon workloads. While this does require additional onus on those implementing and managing workloads, it does provide for a more secure operating environment.

While the Backstage component of the Helm chart itself does not include any specific parameters that would require modification from a security perspective, the included Bitnami postgres Helm chart does specify certain configurations that would conflict when running using OpenShift’s default security profile; specifically within the securityContext properties of the Statefulset. Fortunately, the Bitnami postgres chart does contain options that can be used to modify the default configuration to enable a deployment into OpenShift without requiring additional configurations that would need to be employed. All that needs to be configured is to set enabled: false within the pod level, container level and default securityContext properties within the Values file as shown below

postgresql:
primary:
securityContext:
enabled: false
podSecurityContext:
enabled: false
containerSecurityContext:
enabled: false

Deploying the Backstage Helm Chart

Taking into account each of the considerations that were discussed in the previous sections as well as the baseline configurations that need to be applied to a Fedora based container -- whether it be from the upstream Software Collections or from Red Hat’s certified RHEL based images. The following is a encompassing Helm Values file that should be included in a file called values-openshift.yaml can be used to deploy a Red Hat based set of content (including both Backstage and PostgreSQL) in a manner that is compatible with an OpenShift environment:

values-openshift.yaml
backstage:
image:
registry: ghcr.io
repository: janus-idp/redhat-backstage-build
tag: latest
extraEnvVars:
- name: 'APP_CONFIG_app_baseUrl'
value: 'https://{{ .Values.ingress.host }}'
- name: 'APP_CONFIG_backend_baseUrl'
value: 'https://{{ .Values.ingress.host }}'
- name: 'APP_CONFIG_backend_cors_origin'
value: 'https://{{ .Values.ingress.host }}'
- name: 'APP_CONFIG_backend_database_client'
value: pg
- name: 'APP_CONFIG_backend_database_connection_host'
value: '{{ include "backstage.postgresql.host" . }}'
- name: 'APP_CONFIG_backend_database_connection_port'
value: '5432'
- name: 'APP_CONFIG_backend_database_connection_user'
value: '{{ .Values.postgresql.auth.username }}'
- name: 'APP_CONFIG_backend_database_connection_password'
valueFrom:
secretKeyRef:
key: postgres-password
name: '{{ include "backstage.postgresql.fullname" . }}'
installDir: /opt/app-root/src

ingress:
enabled: true
host: backstage.apps.example.com
annotations:
route.openshift.io/termination: 'edge'

postgresql:
enabled: true
database: backstage
postgresqlDataDir: /var/lib/pgsql/data/userdata
auth:
username: postgres
database: backstage
image:
registry: registry.redhat.io
repository: rhel9/postgresql-13
tag: 1-73
primary:
securityContext:
enabled: false
podSecurityContext:
enabled: false
containerSecurityContext:
enabled: false
persistence:
enabled: true
mountPath: /var/lib/pgsql/data
extraEnvVars:
- name: POSTGRESQL_ADMIN_PASSWORD
valueFrom:
secretKeyRef:
key: postgres-password
name: backstage-postgresql

Be sure to update the ingress.host property with the desired hostname of the exposed Route.

Install the Backstage Helm chart by executing the following command that includes the location of the previously created Values file:

helm install backstage backstage/backstage -f values-openshift.yaml
note

The prior command assumes that the Helm CLI and the Backstage Helm repository have been added to the local machine. Consult prior articles for instructions on how to configure these steps.

Once the Chart release is successful, confirm that not only that both Backstage and PostgreSQL pods are running, but that an edge terminated Route has been created to enable external access to the Backstage user interface. Open a web browser to the hostname defined within the Route to confirm the Backstage user interface can be accessed securely.

With only a few small steps as demonstrated within this article and thanks to the Backstage Helm chart, Backstage and its required dependencies can be deployed to an OpenShift environment. In no time at all, teams can begin building and consuming developer portals that are built on a hardened and secure foundation to enable organizations the ability to realize the benefits offered by Internal Developer Platforms.

· 11 min read
Andrew Block
note

This article is a followup to the article Enabling Keycloak Authentication in Backstage. It is important that the steps outlined within this article are completed prior as described prior to starting this article.

A directory service is a common component found in organizations big and small as it includes a facility for maintaining key assets including users, groups and their relationships. The Backstage catalog provides similar capabilities to assemble not only identity records, but other resources related to various software components. Items are added to the catalog manually or they are sourced from external locations. Several plugins associated with external providers including Azure, GitHub, GitLab and LDAP, support ingesting organizational data (Users and Groups) directly into the Backstage catalog.

In a prior article, it was described how Keycloak can be used to act as an identity provider to store users and groups along with enforcing that users accessing Backstage authenticate against the Keycloak instance. Even though users are authenticated into Backstage, records are not added to the Backstage catalog, thus restricting the ability to fully utilize the capabilities of Backstage. Fortunately, a plugin has been developed by the Janus community to perform similar functionality as the other external providers to integrate Keycloak user and group entities into the Backstage catalog.

This article will describe the steps involved to implement its use within Backstage. The keycloak-backend plugin is one of an increasing set of plugins found within the backstage-plugins repository that have been developed by the Janus community to expand the interoperability between Backstage and a variety of open source projects. These plugins are published within the @janus-idp npm repository which allows them to be added to Backstage with ease. Support for ingesting users and groups from Keycloak by way of the plugin only requires a few steps within Backstage itself.

Backstage Configuration

The Backstage plugin to ingest Keycloak organizational data is implemented as a backend plugin. Architecturally, Backstage is separated into two separate components: the frontend which includes the user interface and many other user facing features, and the backend which powers a variety of plugins including the software catalog. Since the purpose of a provider (plugin) is to synchronize organization data into the Backstage catalog, it is clear to see why it is implemented as a backend plugin.

Unlike the oauth2Proxy provider which was detailed in the prior article, the Keycloak backend plugin is not included as part of the standard installation of Backstage and must be installed. Plugins that are not included by default can be installed using the yarn add command.

From the Backstage root directory, execute the following command to add the Keycloak backend plugin:

yarn --cwd packages/backend add @janus-idp/backstage-plugin-keycloak-backend

Now that the plugin has been installed, register the plugin by adding the following content to the packages/backend/src/plugins/catalog.ts file.

packages/backend/src/plugins/catalog.ts
// ..
import { KeycloakOrgEntityProvider } from '@janus-idp/backstage-plugin-keycloak-backend';

export default async function createPlugin(env: PluginEnvironment): Promise<Router> {
const builder = await CatalogBuilder.create(env);

builder.addEntityProvider(
KeycloakOrgEntityProvider.fromConfig(env.config, {
id: 'development',
logger: env.logger,
schedule: env.scheduler.createScheduledTaskRunner({
frequency: { hours: 1 },
timeout: { minutes: 50 },
initialDelay: { seconds: 15 },
}),
}),
);

// ..
}

Feel free to customize the values of the frequency, timeout, and initialDelay parameters as desired.

Build an updated container image according to the steps described here so that it can be deployed to a Kubernetes environment.

The Keycloak backend plugin as well as the configurations described previously are included within the reference container image is located at quay.io/ablock/backstage-keycloak:latest if there was a desire to once again forgo producing a container image.

Configuring Keycloak

Even though the majority of the configuration within Keycloak to populate Users, Groups and an OAuth client was completed previously, additional actions must be completed so that the Keycloak backend plugin has the necessary permissions to query the resources that are stored within the backstage Keycloak realm. Keycloak clients can be configured to act as a Service Account allowing for additional permissions to be granted to the client to query the Keycloak API.

To enable a Client to act as a Service Account, this capability, login to the Keycloak instance and navigate to the Keycloak Client created previously within the backstage realm and navigate to the Capability config section and check the Service accounts roles checkbox. Click Save to apply the changes.

By default, Keycloak Service Accounts are not granted the necessary permissions to obtain user and group information within the realm. Additional configurations are needed so that the Backstage Keycloak plugin can perform user and group queries.

  1. Login to the Keycloak instance and navigate to the backstage OAuth client within the backstage realm. Click on the Service Account roles tab so that the necessary permissions can be associated with the OAuth client.

  2. Click on the Assign role button to associate existing roles and enable permissions against the Keycloak Service Account.

  3. Select the Filter by realm roles dropdown and click Filter by clients to display client specific roles.

  4. Enter realm-management into the textbox in order to limit the number of values that are returned.

  5. Check the following roles keeping in mind that the option to select the role may only be available within a separate page:

    • query-groups
    • query-users
    • view-users
  6. Click Assign to add the roles to the backstage service account. Once completed, the values present within the Service accounts role tab is represented by the screenshot below.

Keycloak - Service accounts roles

With the necessary Service Account roles associated with the OAuth client, the Keycloak backend plugin will be able to query the necessary information from the Keycloak API.

Backstage Kubernetes Deployment

Now that both a container image of Backstage containing the necessary components to ingest Keycloak organizational data has been created and Keycloak itself has been configured to enable the Keycloak backend plugin to query the Keycloak API, the final step is to deploy an instance of Backstage to a Kubernetes environment using the Backstage Helm chart.

Once again the versatility of the Backstage Helm charts allows for a wide range of options to be configured, including the ability to enable the provider by way of environment variables within the backstage container.

Create a new file called values-backstage-keycloak-plugin.yaml containing the Helm values that will be used to enable the Keycloak backend plugin with the following content:

values-backstage-keycloak-plugin.yaml
backstage:
image:
registry: quay.io
repository: ablock/backstage-keycloak
tag: latest
extraEnvVars:
- name: 'APP_CONFIG_app_baseUrl'
value: 'https://{{ .Values.ingress.host }}'
- name: 'APP_CONFIG_backend_baseUrl'
value: 'https://{{ .Values.ingress.host }}'
- name: 'APP_CONFIG_backend_cors_origin'
value: 'https://{{ .Values.ingress.host }}'
- name: 'APP_CONFIG_backend_cors_origin'
value: 'https://{{ .Values.ingress.host }}'
- name: 'APP_CONFIG_catalog_providers_keycloakOrg_default_baseUrl'
value: '{{ required "Keycloak BaseUrl is Required" .Values.keycloak.baseUrl }}'
- name: 'APP_CONFIG_catalog_providers_keycloakOrg_default_loginRealm'
value: '{{ required "Keycloak Realm is Required" .Values.keycloak.realm }}'
- name: 'APP_CONFIG_catalog_providers_keycloakOrg_default_realm'
value: '{{ required "Keycloak Realm is Required" .Values.keycloak.realm }}'
- name: 'APP_CONFIG_catalog_providers_keycloakOrg_default_clientId'
value: '{{ required "Keycloak Client Secret is Required" .Values.keycloak.clientId }}'
- name: 'APP_CONFIG_catalog_providers_keycloakOrg_default_clientSecret'
value: '{{ required "Keycloak Client Secret is Required" .Values.keycloak.clientSecret }}'

extraContainers:
- name: oauth2-proxy
env:
- name: OAUTH2_PROXY_CLIENT_ID
value: '{{ required "Keycloak Client Secret is Required" .Values.keycloak.clientId }}'
- name: OAUTH2_PROXY_CLIENT_SECRET
value: '{{ required "Keycloak Client Secret is Required" .Values.keycloak.clientSecret }}'
- name: OAUTH2_PROXY_COOKIE_SECRET
value: '{{ default (randAlpha 32 | lower | b64enc) .Values.keycloak.cookieSecret }}'
- name: OAUTH2_PROXY_OIDC_ISSUER_URL
value: '{{ required "Keycloak Issuer URL is Required" .Values.keycloak.baseUrl }}/realms/{{ required "Keycloak Realm is Required" .Values.keycloak.realm }}'
- name: OAUTH2_PROXY_SSL_INSECURE_SKIP_VERIFY
value: 'true'
ports:
- name: oauth-proxy
containerPort: 4180
protocol: TCP
imagePullPolicy: IfNotPresent
image: 'quay.io/oauth2-proxy/oauth2-proxy:latest'
args:
- '--provider=oidc'
- '--email-domain=*'
- '--upstream=http://localhost:7007'
- '--http-address=0.0.0.0:4180'
- '--skip-provider-button'

service:
ports:
backend: 4180
targetPort: oauth-proxy

ingress:
enabled: true
host: backstage.example.com

keycloak:
baseUrl: '<KEYCLOAK_URL>'
realm: 'backstage'
clientId: 'backstage'
clientSecret: ''
cookieSecret: ''

The Keycloak backend plugin is enabled by declaring environment variables with the prefix APP_CONFIG_catalog_providers_keycloakOrg_default_* and when rendered at runtime take a form similar to the following:

catalog:
providers:
keycloakOrg:
default:
baseUrl: <BASE_URL>
loginRealm: <KEYCLOAK_LOGIN_REALM>
realm: <KEYCLOAK_REALM>
clientId: <KEYCLOAK_CLIENTID>
clientSecret: <KEYCLOAK_CLIENTSECRET>

Several fields require that the parameters be provided either within the Values file itself or as parameters using the --set option when deploying the chart.

Update the keycloak.baseUrl parameter to reference the location of the Keycloak instance along with specifying the backstage OAuth client secret within the keycloak.clientSecret parameter. In addition, specify the hostname of the backstage instance within the ingress.host property. If a container image was created that includes the configurations to support not only the Keycloak backend plugin as well as OAuth integration as described in the previous article, specify the details within the backstage.image property.

With the necessary parameters configured, perform an upgrade of the Backstage helm chart by executing the following command. If an existing release does not already exist, the inclusion of the -i parameter ensures that it will be installed.

helm upgrade -i -n backstage --create-namespace backstage
backstage/backstage -f values-backstage-keycloak-plugin.yaml
note

If the Backstage Helm chart was previously installed with persistence enabled using a random password generation strategy, the chart must be uninstalled first.

Once the release is complete, the Backstage user interface can be accessed via the created Ingress and continues to be governed by Keycloak based OAuth authentication. However, if the log from the Backstage container is inspected, the Keycloak backend plugin can be seen in action.

Execute the following command to view the Backstage container log:

kubectl -n backstage logs deployment/backstage
2022-12-24T23:24:36.299Z catalog info Reading Keycloak users and groups type=plugin class=KeycloakOrgEntityProvider taskId=KeycloakOrgEntityProvider:default:refresh taskInstanceId=a8c1693c-b5cb-439a-866d-c1b6b7754a77
2022-12-24T23:24:36.382Z catalog info Read 2 Keycloak users and 2 Keycloak groups in 0.1 seconds. Committing... type=plugin class=KeycloakOrgEntityProvider taskId=KeycloakOrgEntityProvider:default:refresh taskInstanceId=a8c1693c-b5cb-439a-866d-c1b6b7754a77
2022-12-24T23:24:36.386Z catalog info **Committed 2 Keycloak users and 2 Keycloak groups in 0.0 seconds.** type=plugin class=KeycloakOrgEntityProvider taskId=KeycloakOrgEntityProvider:default:refresh taskInstanceId=a8c1693c-b5cb-439a-866d-c1b6b7754a77

Observe in the container log that the plugin identified two users and two groups from the Keycloak realm which have been imported into the backstage catalog. The contents of the Backstage catalog can be inspected by querying the Backstage API. Execute the following command to execute a command within the Backstage pod to query the API and format the results using jq. If jq is not installed on the local machine, it can be removed from the command.

kubectl -n backstage exec -c oauth2-proxy deployment/backstage -- wget -q --output-document - "http://localhost:7007/api/catalog/entities?filter=kind=user" | jq -r

[
{
"metadata": {
"namespace": "default",
"annotations": {
"backstage.io/managed-by-location": "url:https://keycloak.apps.cluster-cmwgv.cmwgv.sandbox2741.opentlc.com/admin/realms/backstage/users/1e703d12-cb09-4c7e-b615-7ea620725006",
"backstage.io/managed-by-origin-location": "url:https://keycloak.apps.cluster-cmwgv.cmwgv.sandbox2741.opentlc.com/admin/realms/backstage/users/1e703d12-cb09-4c7e-b615-7ea620725006",
"backstage.io/view-url": "https://keycloak.apps.cluster-cmwgv.cmwgv.sandbox2741.opentlc.com/admin/realms/backstage/users/1e703d12-cb09-4c7e-b615-7ea620725006",
"keycloak.org/id": "1e703d12-cb09-4c7e-b615-7ea620725006",
"keycloak.org/realm": "backstage"
},
"name": "backstageadmin",
"uid": "25f4a1bb-e035-4f3a-b618-4d16876325d7",
"etag": "ab5c4076701c76d9a6215a9f7e2fd5b1e6035790"
},
"apiVersion": "backstage.io/v1beta1",
"kind": "User",
"spec": {
"profile": {
"email": "backstageadmin@janus-idp.io",
"displayName": "Backstage Admin"
},
"memberOf": [
"Admins"
]
},
"relations": [
{
"type": "memberOf",
"targetRef": "group:default/admins",
"target": {
"kind": "group",
"namespace": "default",
"name": "admins"
}
}
]
},
{
"metadata": {
"namespace": "default",
"annotations": {
"backstage.io/managed-by-location": "url:https://keycloak.apps.cluster-cmwgv.cmwgv.sandbox2741.opentlc.com/admin/realms/backstage/users/90625bf5-5e63-434e-96b7-288908907134",
"backstage.io/managed-by-origin-location": "url:https://keycloak.apps.cluster-cmwgv.cmwgv.sandbox2741.opentlc.com/admin/realms/backstage/users/90625bf5-5e63-434e-96b7-288908907134",
"backstage.io/view-url": "https://keycloak.apps.cluster-cmwgv.cmwgv.sandbox2741.opentlc.com/admin/realms/backstage/users/90625bf5-5e63-434e-96b7-288908907134",
"keycloak.org/id": "90625bf5-5e63-434e-96b7-288908907134",
"keycloak.org/realm": "backstage"
},
"name": "backstageuser",
"uid": "96f3f8a1-aaa2-4d4c-89dc-b3e5d22aa049",
"etag": "ad2d9c10fbfad74bb685ad10fdca178b2869516c"
},
"apiVersion": "backstage.io/v1beta1",
"kind": "User",
"spec": {
"profile": {
"email": "backstageuser@janus-idp.io",
"displayName": "Backstage User"
},
"memberOf": [
"Users"
]
},
"relations": [
{
"type": "memberOf",
"targetRef": "group:default/users",
"target": {
"kind": "group",
"namespace": "default",
"name": "users"
}
}
]
}
]

Observe that the relationships between users and groups are also present. Groups imported to the catalog can be inspected by executing the following command to invoke the Backstage API:

kubectl -n backstage exec -c oauth2-proxy deployment/backstage -- wget -q --output-document - "http://localhost:7007/api/catalog/entities?filter=kind=group" | jq -r

Now that the Backstage catalog has been populated, additional metadata will now be associated with users when they authenticate to the Backstage user interface. Launch a web browser and navigate to the Backstage user interface and login using either of the previously created Keycloak users.

Click on the Settings button on the bottom left corner of the page. Ensure the additional relationship details (groups) are present to confirm that the authenticated user has been linked properly to the user in the catalog.

Backstage Settings - Profile identity

The Keycloak backend plugin will run periodically based on the parameters defined within the catalog.ts file to ensure that the Backstage catalog is updated with the current state as defined within keycloak. By providing the capability to ingest organizational data into the Backstage catalog from Keycloak, the benefits that are offered through the use of Keycloak as an identity source can be realized within Backstage.

· 11 min read
Andrew Block

Getting Backstage up and running takes no time at all thanks to the Backstage Helm chart as described in the first article in this series. However, even though Backstage has been deployed, it is hardly ready in its current state for production use. There are several key factors that need to be addressed:

  1. Exposing Backstage properly outside the cluster
  2. Adding persistence

Ingress

Accessing the Backstage instance as part of the initial deployment made use of the kubectl port-forward{:bash} command, which is a key tool that is used as part of the development process. However, in order to make a deployment more representative of how Backstage would need to be configured for a production state, a proper Ingress strategy should be implemented.

Minikube includes a set of features that extend the baseline configuration of Kubernetes, known as addons. Included in the collection of minikube addons is support for deploying the NGINX Ingress Controller to enable more native access to resources within Kubernetes.

Execute the following command to enable the ingress addon which will deploy the NGINX Ingress Controller into a namespace called ingress-nginx:

minikube addons enable ingress

Connecting through the Minikube Ingress Controller

Access to resources deployed within Kubernetes through the ingress controller varies depending on the host operating system. On linux machines which can run containers natively, access can be achieved through the ip address in use by the minikube virtual machine. This address can be obtained by running the minikube ip{:bash} command.

On OSX machines, a tunnel can be created for which connectivity can be achieved through the ingress controller using the minikube tunnel command. Since this will expose the tunnel on ports 80 and 443, elevated permissions are needed. A password prompt will appear requesting permission to access these privileged ports.

Accessing Backstage through the Minikube Ingress Controller

To configure Backstage to expose an Ingress through the newly created ingress controller, update the content of the values that are used for the Backstage Helm chart by creating a new values file called values-minikube-ingress.yaml with the following content:

values-minikube-ingress.yaml
backstage:
extraEnvVars:
- name: 'APP_CONFIG_app_baseUrl'
value: 'http://{{ .Values.ingress.host }}'
- name: 'APP_CONFIG_backend_baseUrl'
value: 'http://{{ .Values.ingress.host }}'
- name: 'APP_CONFIG_backend_cors_origin'
value: 'http://{{ .Values.ingress.host }}`'

ingress:
enabled: true
host: localhost

The only noticeable difference between the content of these values versus the prior content contained in the values-minikube-ingress.yaml is enabling the creation of the Ingress resource which is triggered by setting the enabled field within the ingress property to true.

For those making use of a Linux machine, since the ingress controller is accessed through the IP address of the minikube VM, a fake hostname (backstage.minikube.info) can be created by setting the following value in the /etc/hosts file.

$(minikube ip) backstage.minikube.info

Alternatively, a wildcard IP address DNS service, such as nip.io can be used if there was a desire to avoid modifying the /etc/hosts file.

Regardless of the approach, when using a Linux machine, update the value of the host field within the ingress property in the values-minikube-ingress.yaml file to the hostname configured above.

Create a new Helm release by performing an upgrade of the prior release by providing the updated values file as shown below:

helm upgrade -n backstage backstage backstage/backstage -f values-minikube-ingress.yaml

Once the release is complete, a new Ingress resource will have been created in the backstage namespace to expose Backstage outside the cluster.

Navigate to the hostname that was defined in the Ingress resource. Due to caching techniques employed by many web browsers, a “hard reload” of the page may be required in order to ensure the updated set of Javascript resources from the Backstage instance. Consult the documentation of the browser being used for the necessary steps.

By exposing and accessing Backstage through a Kubernetes Ingress, it better aligns to how one would want to configure Backstage for a production deployment.

Persistence

To simplify the getting started experience for users, Backstage makes use of an in-memory SQLite database as a persistent store. While this reduces the initial barrier of entry, it also limits how far one can go in their Backstage journey. Limitations with this implementation include the ability to achieve high-availability as each instance of Backstage has its own independent persistent store and existing data would be lost if the pod is restarted or deleted.

PostgreSQL is the database backend that is used by Backstage store data persistently and the Backstage Helm chart includes the ability to provision a deployment of PostgreSQL in order to support Backstage. The postgres Helm chart from Bitnami as a dependency chart which is, as demonstrated previously, disabled by default. Similar to how ingress was enabled in the prior section, enabling and configuring the integration between PostgreSQL and Backstage can be achieved through the Backstage Helm chart.

Create a new values file called values-minikube-persistent.yaml with the following content:

values-minikube-persistent.yaml
backstage:
extraEnvVars:
- name: 'APP_CONFIG_app_baseUrl'
value: 'http://{{ .Values.ingress.host }}'
- name: 'APP_CONFIG_backend_baseUrl'
value: 'http://{{ .Values.ingress.host }}'
- name: 'APP_CONFIG_backend_cors_origin'
value: 'http://{{ .Values.ingress.host }}'
args:
- '--config'
- '/app/app-config.yaml'
- '--config'
- '/app/app-config.production.yaml'

ingress:
enabled: true
host: localhost

postgresql:
enabled: true
auth:
username: bn_backstage
database: backstage
primary:
persistence:
enabled: true

While no changes occurred within the set of extra environment variables, several new properties were added; specifically args and postgresql. Setting postgresql.enabled will trigger the installation of the postgresql chart as defined in the Chart.yaml file. The postgresql section also specifies the username and database that should be created on the PostgreSQL instance along with the creation of a PersistentVolumeClaim within Kubernetes that will serve as the backing storage for the database.

The backstage.args property is used to specify the container arguments that are injected into the Backstage container. When an installation of Backstage is created, several sample application configuration files are created: One that contains the baseline configuration for Backstage, one that features configurations that are designed for production use and one that can be used to specify configurations that are used for local development. The production configuration file (app-config.production.yaml) includes the necessary configurations to enable Backstage to use PostgreSQL as its persistence store. The location of these configuration files are added as arguments using the --config flag as declared in values file sample above.

Several options are available within the Bitnami postgres chart to set the password for the newly created database use including providing it within a Kubernetes secret, explicitly as a Helm Value, or having one automatically generated which is the option that will be chosen in this case. There is one disadvantage to having the chart automatically generate the password; The helm upgrade command cannot be used as each invocation would result in a newly generated password, thus invalidating the prior value and causing issues for clients looking to connect.

As a result, uninstall the previously created chart from the minikube cluster by executing the following command:

helm uninstall -n backstage backstage

With the chart now uninstalled and the resources removed from the cluster, install a brand new instance of Backstage with persistence support by executing the following command. In addition, be sure to update the host field underneath the ingress property if a different value was used from the Ingress section of this article.

helm install -n backstage backstage backstage/backstage -f values-minikube-persistent.yaml

Once the release is complete, there will be two pods in the backstage namespace: one for the instance of backstage and the other for PostgreSQL. Confirm that the Backstage instance has connected and created the necessary tables within PostgreSQL by executing the following command:

kubectl exec -it -n backstage statefulset/backstage-postgresql -- sh -c "export PGPASSWORD=$(kubectl get secrets -n backstage backstage-postgresql  -o jsonpath='{.data.postgres-password}' | base64 -d) && psql --host localhost -U postgres -c '\l'"

Several tables prefixed with “backstage” should be present and once confirmed, one has the assurance Backstage is making use of the PostgreSQL instance and storing data persistently.

Replacing the Default Images

One of the most common tasks for anyone working with Backstage is the customization of the components that are installed within the Backstage instance. This typically includes the addition of plugins that extend the baseline functionality of Backstage to enable the integration with external systems. The Backstage Helm chart references a container image from the Backstage community, but in many cases, does not include all of the components that may be needed by consumers. As a result, those looking to use Backstage in their own environment will need to produce their own instance of Backstage and store the resulting image in a container registry. The location of this instance can be specified as a set of Helm values to enable users to leverage their own image.

The Janus community also produces a minimal container image, similar to the upstream backstage community, to provide an instance of Backstage that is built from an Universal Base Image (UBI) base. Switching from the upstream Backstage image to the Janus project image can be used to demonstrate the common task of replacing where the container image of Backstage is sourced from.

The following values illustrate how to switch to the Janus provided image. Keep in mind that in practice, you will most likely need to use an image of your own with your specific customizations, but this provides a good example for understanding the process involved.

backstage:
image:
registry: ghcr.io
repository: janus-idp/redhat-backstage-build
tag: latest

Any of the Helm values files that were provided in the prior sections can be used to demonstrate substituting the location of the Backstage image.

Each Backstage image can feature a different database schema, therefore if an existing Helm release has been deployed previously with postgresql enabled, uninstall it so that the new configurations can be applied. In addition, if persistent storage was used to support PostgreSQL, the PersistentVolumeClaim that was also created needs to be manually removed. This can be achieved using the following command:

kubectl delete pvc -n backstage -l=app.kubernetes.io/name=postgresql

Once all of the resources have been removed, use the Backstage Helm chart to deploy Backstage with the updated set of values. Confirm the image associated with the Backstage deployment is leveraging the custom image by executing the following command:

kubectl get deployment -n backstage backstage -o jsonpath='{ .spec.template.spec.containers[?(@.name=="backstage-backend")].image }'

Customizing the PostgreSQL Configuration

Similar to the Backstage image itself, the image associated with the PostgreSQL instance can also be customized if there was a desire to make use of an alternate image other than the image provided by the Bitnami postgres Helm chart. Given that the Janus community is a Red Hat sponsored initiative, switching to a PostgreSQL image that is provided from Red Hat Software Collections is a common task. Fortunately, the combination of features provided by the Backstage and Bitnami postgres Helm charts enable not only the customization of image location, but additional configurations that are needed to support any other required configurations needed to support an alternate image.

Create a new values file called values-minikube-persistent-scl.yaml with the following content:

backstage:
extraEnvVars:
- name: "APP_CONFIG_app_baseUrl"
value: "http://{{ .Values.ingress.host }}"
- name: "APP_CONFIG_backend_baseUrl"
value: "http://{{ .Values.ingress.host }}"
- name: "APP_CONFIG_backend_cors_origin"
value: "http://{{ .Values.ingress.host }}"
- name: "APP_CONFIG_backend_database_connection_password" (1)
valueFrom:
secretKeyRef:
key: postgres-password
name: "{{ include \"backstage.postgresql.fullname\" . }}"
args:
- "--config"
- "/app/app-config.yaml"
- "--config"
- "/app/app-config.production.yaml"

ingress:
enabled: true
host: localhost

postgresql:
enabled: true
database: backstage
postgresqlDataDir: /var/lib/pgsql/data/userdata (2)
auth: (3)
username: postgres
database: backstage
image: (4)
registry: quay.io
repository: fedora/postgresql-13
tag: "13"
primary:
securityContext:
enabled: false
podSecurityContext:
enabled: false
containerSecurityContext:
enabled: false
persistence:
enabled: true
mountPath: /var/lib/pgsql/data
extraEnvVars:
- name: POSTGRESQL_ADMIN_PASSWORD (5)
valueFrom:
secretKeyRef:
key: postgres-password
name: backstage-postgresql

There are quite a number of additional configurations that are included within this values file. Let's break down some of the most important configurations to illustrate their significance:

  1. The Software Collections PostgreSQL image manages permissions differently than the Bitnami PostgreSQL image and the key within the generated Secret differs and needs to be provided for the Backstage container
  2. Specifies the location of where PostgreSQL stores persistent content
  3. The name of the database to use and user to authenticate against
  4. The location of the Software Collections image
  5. The environment variable used by the Software Collections PostgreSQL image to signify the password for the postgres admin account

Uninstall and reinstall the Backstage Helm chart once again so that the Software Collections image will be used to support PostgreSQL.

As demonstrated throughout this article, the Helm chart for Backstage provides a robust set of capabilities in order to support customizing and orchestrating a deployment to a Kubernetes environment. By simplifying the steps that it takes to deploy Backstage, the benefits when establishing an Internal Developer Platform can be realized.

· 12 min read
Andrew Block

The software catalog is the heart of Backstage as it provides a centralized mechanism for organizing all of the assets within a particular domain. This content can include everything from services, websites, pipelines and everything in between and the catalog provides a facility for managing these assets in a declarative fashion along with assigning ownership against them. Identity records within Backstage are represented as Users (individual entities) and Groups (a collection of users) and they enable the association of ownership and policies to resources within the software catalog. The determination of who the user is and their association to a User entity within the software catalog is the core functionality of the authentication system within Backstage. Every installation of Backstage includes a number of built-in authentication providers, and while GitHub is the most common, several alternatives are available to choose from including GitLab, Google and Azure.

Keycloak is an Open Source identity and access management tool and provides capabilities including Single Sign On (SSO), user management and support for fine grained authorization policies. In addition to these features, one of the biggest benefits of Keycloak is that it can federate identities from other external providers including many of the built-in authentication providers within Backstage. By integrating Backstage with Keycloak, a single source of truth as it relates to identity can be attained. The benefits include avoiding the process of having to manage multiple authentication providers along with allowing for a more “cloud native” method of authentication and authorization using the OpenID Connect (OIDC) protocol. Enabling users to authenticate against Keycloak to gain access to Backstage is a straightforward process and will be described throughout the remainder of this article.

Prior to performing any configuration within either Keycloak or Backstage, the first step is to better understand the architecture and the overall process. Unlike other providers, such as those that were introduced previously (GitHub, Google, etc), there is no direct integration between Backstage and Keycloak. Instead, the OAuth2 proxy provider is implemented through the use of the oauth2-proxy to act as an intermediate for offloading the entire authentication process which passes the resulting request for Backstage to process. An overview of the entire flow is described below:

  1. OIDC client is created within Keycloak representing the integration with Backstage and configured within the OAuth2 proxy.
  2. Users attempts to access Backstage and is redirected to Keycloak by the OAuth2 proxy
  3. User authenticates against Keycloak
  4. Upon successful authentication to Keycloak, OAuth process verifies user has met all necessary requirements that are needed to access Backstage
  5. Request to Backstage for the processing of the authentication
  6. Backstage Sign In Resolver ingests request (reading headers provided by the OAuth2 proxy) and either associates the user within an existing entry in the software catalog or a new entry is created
  7. Authentication process is complete and the user can make use of Backstage based on their level of access

As this list illustrates, there are several steps involved to enable Backstage users to authenticate against Keycloak. The first step is to set up Backstage with the necessary configurations to enable the OAuth2 provider.

Backstage Configuration

Similar to the other authentication providers that are included with Backstage, there are steps that must be completed within Backstage itself to support using Keycloak authentication by way of the OAuth 2 Proxy Provider including:

  • Adding the provider to the Backstage frontend
  • Updating the Backstage app-config.yaml configuration file to enable the OAuth2 Proxy Provider
  • Configuring a Sign in Resolver within the Backstage backend

First, update the Backstage frontend by enabling the ProxiedSignInPage by making the following changes in the packages/app/src/App.tsx file:

packages/app/src/App.tsx
import { ProxiedSignInPage } from '@backstage/core-components';

const app = createApp({
// ...
components: {
SignInPage: (props) => <ProxiedSignInPage {...props} provider="oauth2Proxy" />,
},
});

Next, add the oauth2Proxy to the list of authentication providers within the Backstage app-config.yaml configuration file:

app-config.yaml
auth:
providers:
oauth2Proxy: {}

The final required configuration within backstage is to set up an Identity Resolver which will translate the parameters (headers) that are received from the OAuth2 proxy and translate them into an authenticated backstage user. Update the packages/backend/src/plugins/auth.ts file with the following content:

packages/backend/src/plugins/auth.ts
import { DEFAULT_NAMESPACE, stringifyEntityRef } from '@backstage/catalog-model';

export default async function createPlugin(env: PluginEnvironment): Promise<Router> {
return await createRouter({
// ...
providerFactories: {
...defaultAuthProviderFactories,
// ...
oauth2Proxy: providers.oauth2Proxy.create({
signIn: {
async resolver({ result }, ctx) {
const name = result.getHeader('x-forwarded-preferred-username');
if (!name) {
throw new Error('Request did not contain a user');
}

try {
// Attempts to sign in existing user
const signedInUser = await ctx.signInWithCatalogUser({
entityRef: { name },
});

return Promise.resolve(signedInUser);
} catch (e) {
// Create stub user
const userEntityRef = stringifyEntityRef({
kind: 'User',
name: name,
namespace: DEFAULT_NAMESPACE,
});
return ctx.issueToken({
claims: {
sub: userEntityRef,
ent: [userEntityRef],
},
});
}
},
},
}),
},
});
}

The logic included within the identity resolver above is as follows:

  1. Obtain the username that is provided in the x-forwarded-preferred-username by the OAuth2 proxy.
  2. Attempt to locate the user in the Backstage catalog
    1. If found, sign in the user
  3. If a user is not found, create a user on the fly and sign them in

Once each of the actions detailed within this section have been completed, the final step is to produce a build of Backstage. Since the target environment for this demonstration will be a Kubernetes environment, a container image will be the end result of the build process. The steps for producing a container image can be found here.

A reference container image is located at quay.io/ablock/backstage-keycloak:latest if there was a desire to forgo producing a container image.

Configuring Keycloak

Now that Backstage has been configured to support OAuth based authentication, the next step is to set up and configure Keycloak as an identity provider. Keycloak supports being installed in a variety of different ways including as a standalone application or within a container. Consult the documentation for instructions on how to get started and the process involved to install Keycloak. The easiest method, especially when deploying to a Kubernetes environment, is to use the Keycloak Operator. Once Keycloak has been installed and is running, launch a web browser and navigate to the web administration console and login.

After authenticating to Keycloak, either create a new Realm called backstage or select the name of an existing Realm that will be reused.

note

If you choose to leverage a realm with a name other than backstage, be sure to substitute the name appropriately throughout the remainder of the article.

In order to demonstrate users authenticating against Backstage, several users and groups will be created within the Realm. First select Groups on the left hand navigation pane and then enter the names of the two groups that should be created:

  1. Admins
  2. Users

Once the groups have been provisioned, select Users from the left hand navigation pane and create two users with the following details:

PropertyUser 1User 2
Usernamebackstageadminbackstageuser
Emailbackstageadmin@janus-idp.iobackstageuser@janus-idp.io
Email VerifiedCheckedChecked
First NameBackstageBackstage
Last NameAdminUser
GroupsAdminsUsers

Create User

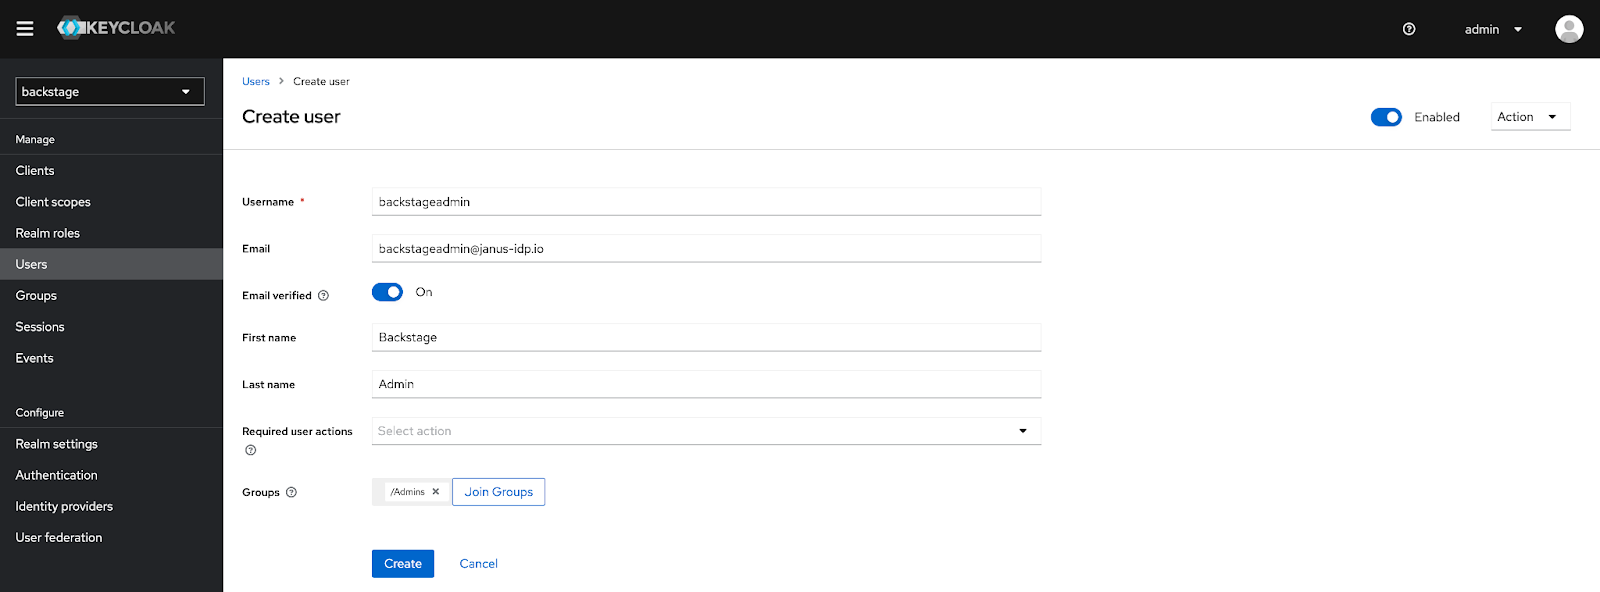
After the accounts have been created, click the Credentials tab and then select Set Password to set an initial password for each account. Feel free to specify a password of your choosing for each user. Uncheck the temporary options so that a password reset is not required upon first login.

Next, an OAuth client needs to be created that will be used by the Backstage OAuth proxy. Select the Clients button on the left hand navigation pane and then click Create Client.

Retain the Client Type as OpenID Connect, enter backstage as the Client ID, and then optionally set a name and description that should be applied to the newly created client and click Next.

On the Capability Config page, ensure the Client authentication checkbox is enabled and click Save to create the client.

Only one configuration needs to be specified on the Settings tab, the Valid redirect URI's. This value represents the endpoint that is exposed by the OAuth2 proxy that will be sitting in front of the Backstage instance, so there is a requirement that the hostname that will be used for Backstage be known.

The OAuth callback url that needs to be configured in the Keycloak Valid Redirect URI's field takes the form <BACKSTAGE_URL>/oauth2/callback. So for example, if Backstage is to be accessed at https://backstage.example.com, the value that should be entered into the field would be https://backstage.example.com/oauth2/callback. Once the value has been entered, click Save.

The next step is to obtain the Client Secret so that it can be used later on as part of the OAuth2-proxy configuration. Navigate to the Credentials page and copy the value present in the Client Secret textbox.

Deploying Backstage using the Backstage Helm Chart

Given that the required prerequisites have been completed and there is a container image of Backstage available and Keycloak has been configured as an Identity Provider, the final step is to deploy Backstage. As previously mentioned, Backstage can be deployed in a variety of ways, but in this case, a deployment to a Kubernetes cluster will be used and the easiest method for deploying Backstage to Kubernetes is to use the Backstage Helm chart as it not only streamlines the deployment process, but provides the capabilities to define the required configurations to enable OAuth authentication with Keycloak. A full writeup on the Backstage Helm chart including the various configurations that it enables can be found here.

The OAuth2 proxy that bridges the integration between Backstage and Keycloak is deployed as a sidecar container alongside Backstage. Sidecar containers can be enabled by specifying the backstage.extraContainer Helm Value. The entire definition of the OAuth proxy container as well as the ability to templatize the required configurations is also supported.

Create a new file called values-backstage-keycloak.yaml with the following content.

values-backstage-keycloak.yaml
backstage:
image:
registry: quay.io
repository: ablock/backstage-keycloak
tag: latest
extraEnvVars:
- name: 'APP_CONFIG_app_baseUrl'
value: 'https://{{ .Values.ingress.host }}'
- name: 'APP_CONFIG_backend_baseUrl'
value: 'https://{{ .Values.ingress.host }}'
- name: 'APP_CONFIG_backend_cors_origin'
value: 'https://{{ .Values.ingress.host }}'

extraContainers:
- name: oauth2-proxy
env:
- name: OAUTH2_PROXY_CLIENT_ID
value: '{{ required "Keycloak Client Secret is Required" .Values.keycloak.clientId }}'
- name: OAUTH2_PROXY_CLIENT_SECRET
value: '{{ required "Keycloak Client Secret is Required" .Values.keycloak.clientSecret }}'
- name: OAUTH2_PROXY_COOKIE_SECRET
value: '{{ default (randAlpha 32 | lower | b64enc) .Values.keycloak.cookieSecret }}'
- name: OAUTH2_PROXY_OIDC_ISSUER_URL
value: '{{ required "Keycloak Issuer URL is Required" .Values.keycloak.issuerUrl }}'
- name: OAUTH2_PROXY_SSL_INSECURE_SKIP_VERIFY
value: 'true'
ports:
- name: oauth2-proxy
containerPort: 4180
protocol: TCP
imagePullPolicy: IfNotPresent
image: 'quay.io/oauth2-proxy/oauth2-proxy:latest'
args:
- '--provider=oidc'
- '--email-domain=*'
- '--upstream=http://localhost:7007'
- '--http-address=0.0.0.0:4180'
- '--skip-provider-button'

service:
ports:
backend: 4180
targetPort: oauth2-proxy

ingress:
enabled: true
host: backstage.example.com

keycloak:
issuerUrl: '<KEYCLOAK_URL>/realms/backstage'
clientId: 'backstage'
clientSecret: ''
cookieSecret: ''
note

The specific configurations provided within this Values file defines a minimum amount of parameters needed to enable the integration between Backstage and Keycloak. It is recommended that the configurations of the OAuth2 proxy be hardened to increase the overall level of security. See the OAuth2 proxy documentation for the full set of supported options available.

Before installing the Helm chart into the Kubernetes cluster, let’s review the contents of the Values file for the significance of certain parameters. The backstage.extraContainers parameter includes the definition of the OAuth2 Proxy and configurations are provided through a combination of container arguments and environment variables.

The location of the Keycloak instance is specified by providing the location of the OpenID Endpoint Configuration. This address can be identified within the Realm Settings page of the backstage Keycloak realm.

Realm Settings

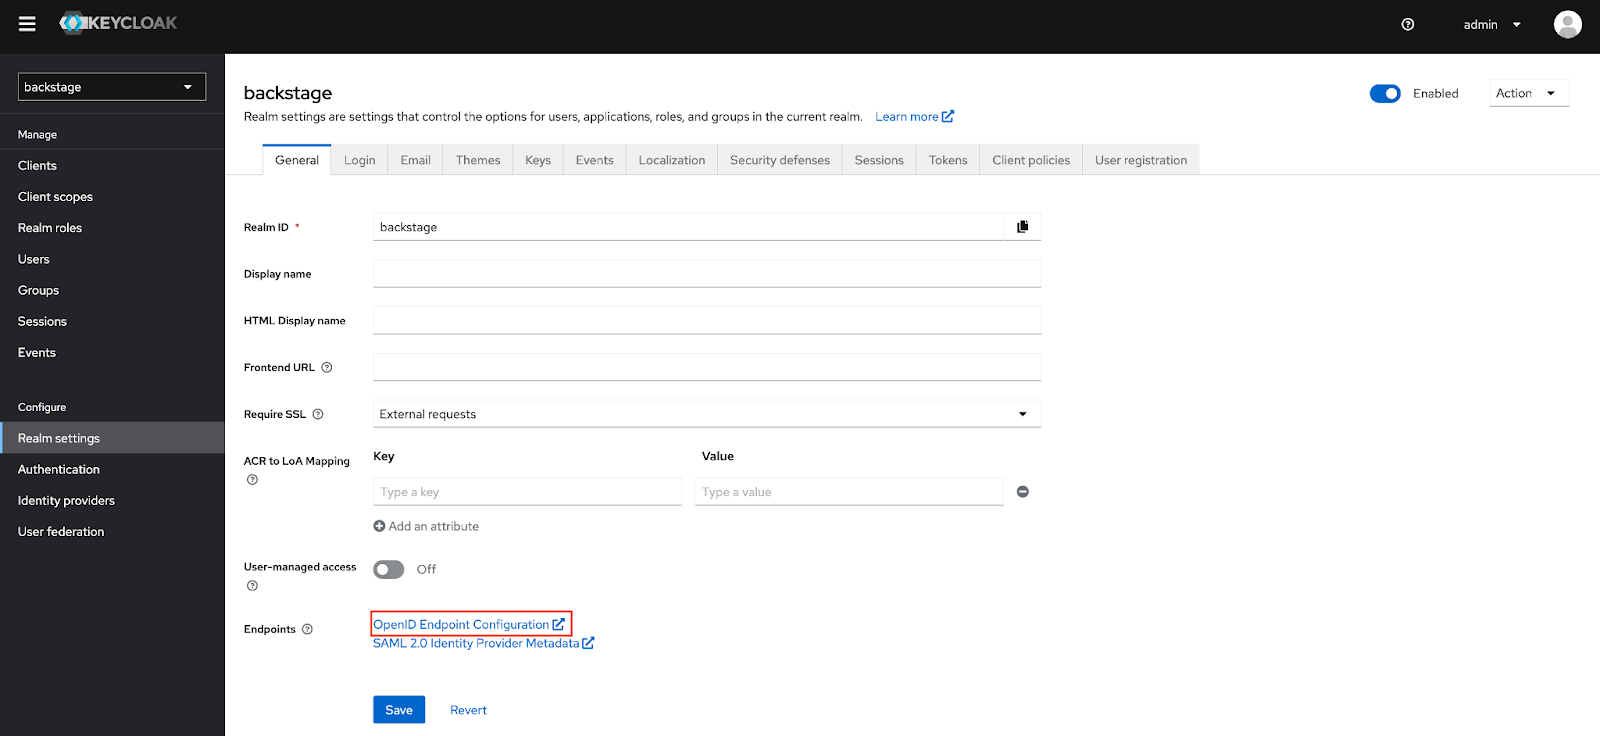
Update the keycloak.issuerURL parameter by providing the value that was obtained from the OpenID Endpoint Configuration. The /.well-known/openid-configuration portion of the URL can be omitted as it is inferred automatically.

Update the keycloak.clientId and keycloak.clientSecret parameters with the values that were obtained from the backstage OAuth client Credentials tab previously.

Next, specify the hostname of the backstage instance by updating the ingress.host parameter.

note

An Ingress Controller must be present within the cluster in order to properly serve requests destined for Backstage from sources originating outside the cluster.

Finally, if there was a desire to make use of a custom Backstage image that was built previously instead of the provided image, update the set of parameters underneath the backstage.image parameter.

Alternatively, instead of updating the contents of the values-backstage-keycloak.yaml Values file, parameters can be provided during the installation of the Helm chart by each parameter using the --set option of the helm install command.

Before the chart can be installed, add the Backstage chart repository as well as the dependant Bitnami repository using the following commands:

helm repo add bitnami https://charts.bitnami.com/bitnami
helm repo add backstage https://backstage.github.io/charts

Install the Backstage Helm chart to the Kubernetes cluster in a new namespace called backstage by executing the following command referencing the customized Values file:

helm install -n backstage --create-namespace backstage backstage/backstage -f values-backstage-keycloak.yaml

Once the Helm release is complete and the backstage container is running, open a web browser and navigate to the location of the Backstage instance.

When navigating to the Backstage, the OAuth2 proxy will intercept the request and redirect the browser to the Keycloak login page.

Keyclock Login

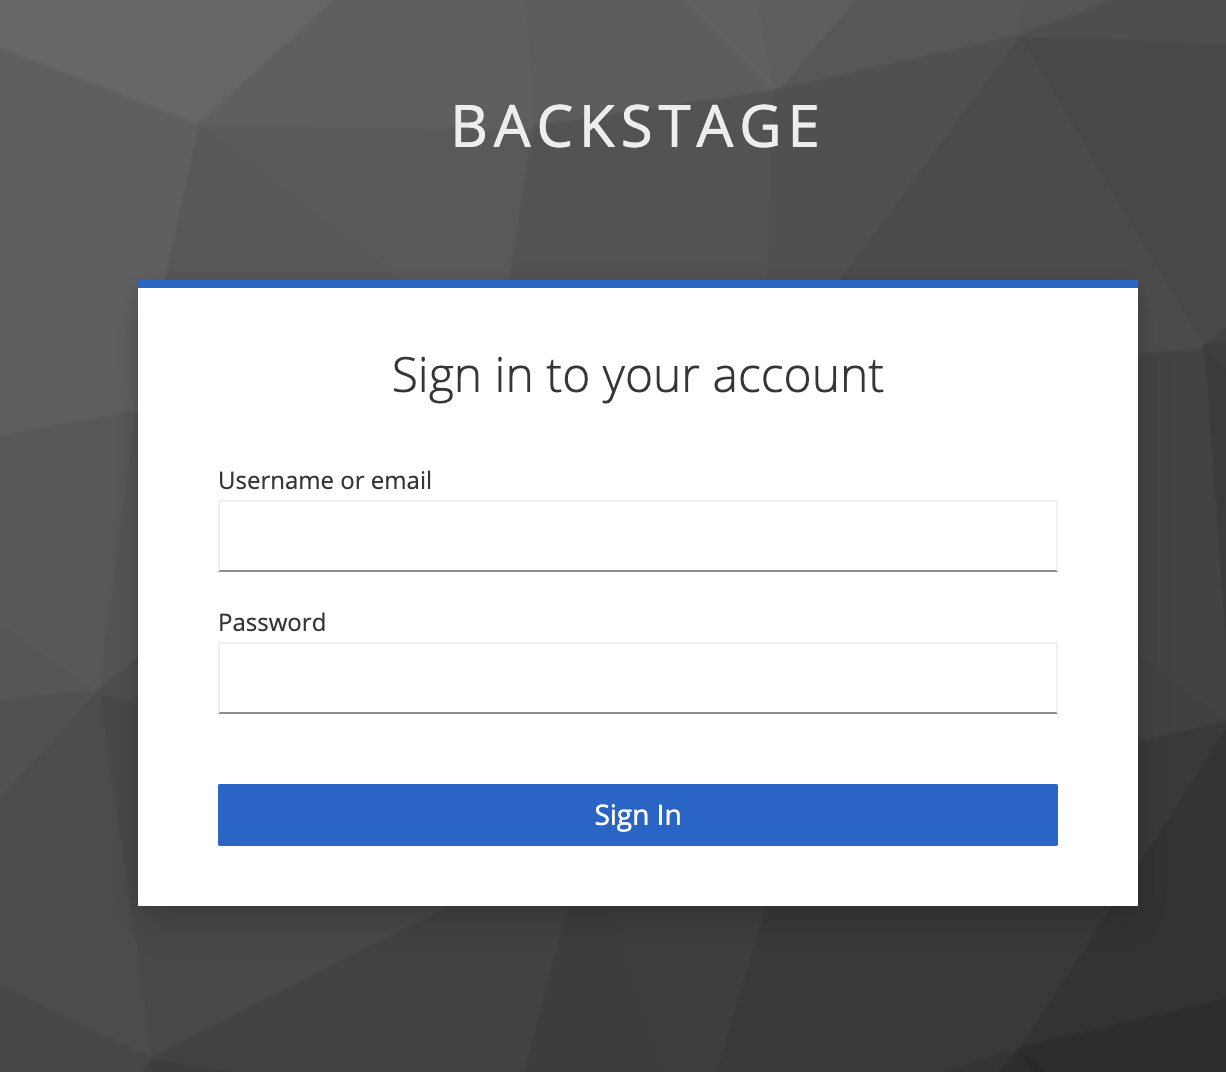
Login with either of the users that were created previously and if successful, the browser will redirect back to the Backstage user interface.

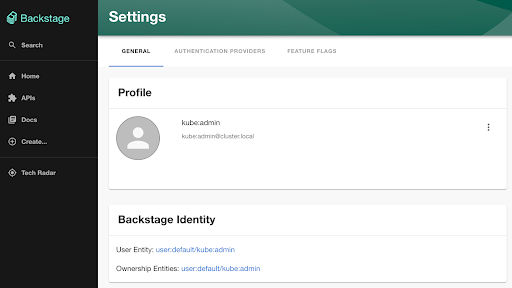
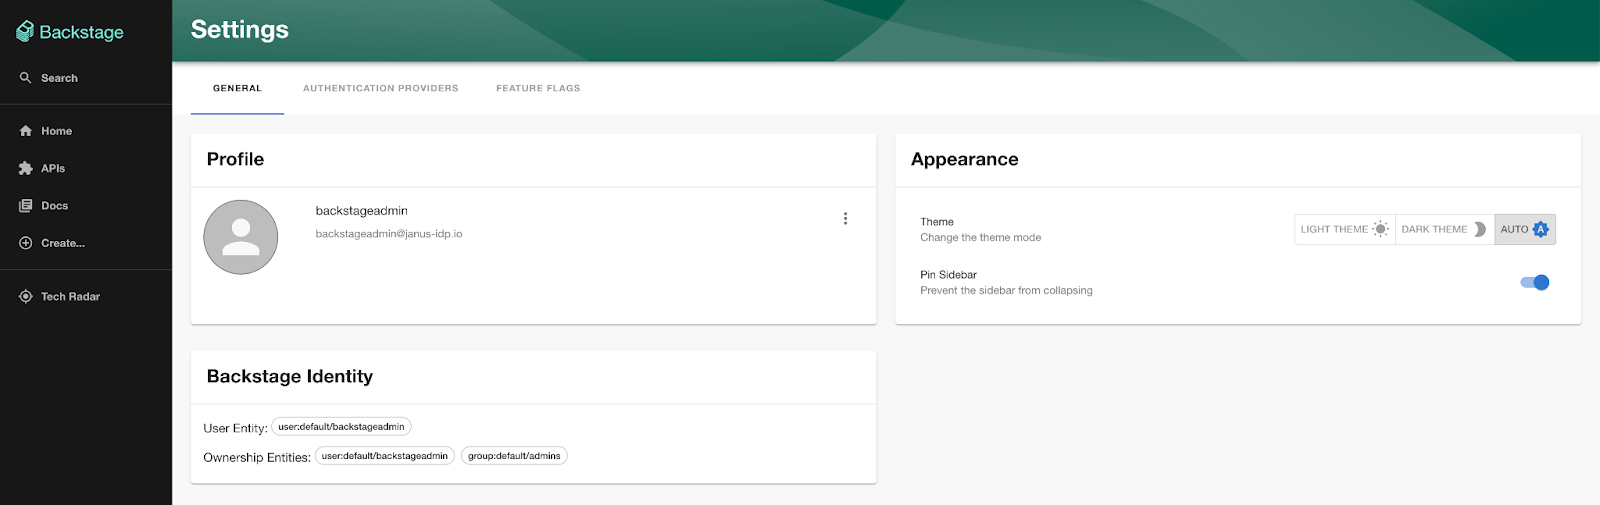
Verify the user details have been passed from Keycloak to Backstage by clicking the Settings button on the left hand navigation pane.

Backstage Settings

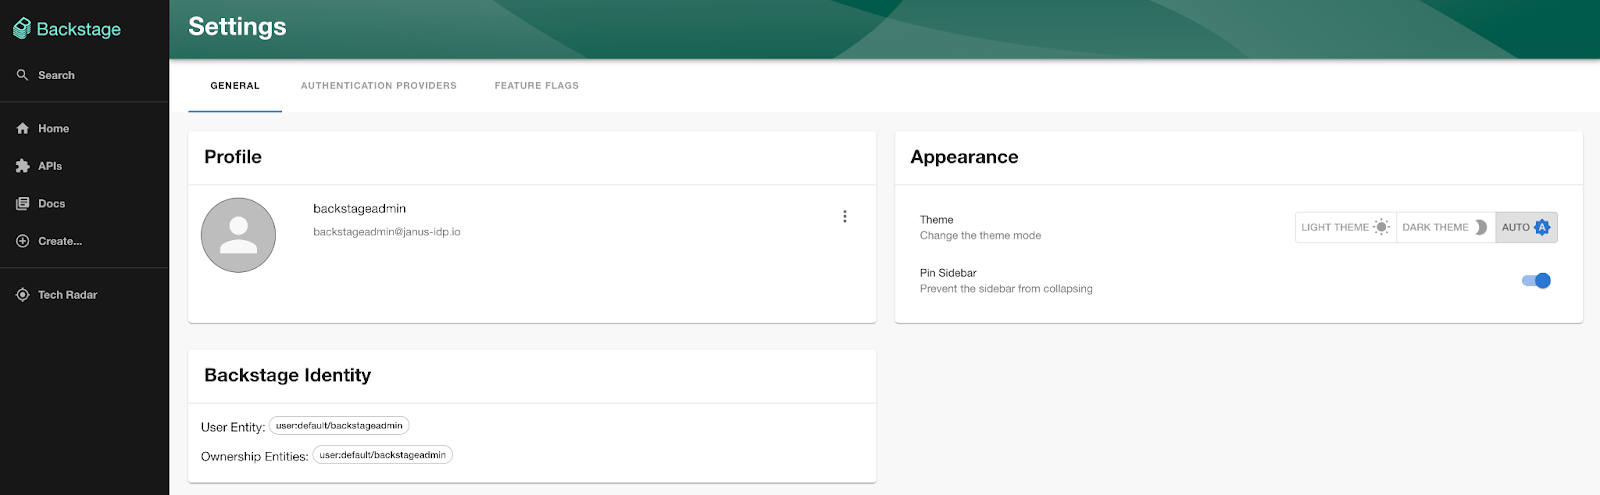
Notice how the username and email address associated with the Keycloak user were passed along to Backstage for which policies and relationships can be created to customize their interactions within the portal.

The integration between Keycloak and Backstage enables Backstage to take advantage of the robust identity capabilities that are provided by Keycloak. By enabling users to authenticate against an instance of Keycloak, the same set of credentials can be used to access the Backstage instance and simplifies the adoption of Backstage within organizations big and small.

· 5 min read
Andrew Block

Red Hat recently announced its intention of joining the Backstage community to help shepherd the adoption of Internal Developer Platforms more broadly. While there are many aspects that one needs to consider when establishing an IDP, where and how the platform will be deployed is certainly near the top of the list. Backstage can be deployed on a variety of target systems ranging from traditional infrastructure (physical servers or virtual machines) to more cloud native options. Given the popularity of Kubernetes these days, it has become a common choice for running applications and Backstage is no exception to the rule. The Janus project is Red Hat’s upstream community for running Internal Developer Platforms and in addition to a series of Backstage plugins that have been recently developed, it has been working with the community to simplify the process for deploying Backstage on Kubernetes. Deploying an application in Kubernetes can take on many forms, and given that the Helm package manager has become the de facto standard for deploying applications on Kubernetes, the Janus project in conjunction with the greater Backstage community have come together to establish a canonical Helm chart for deploying and maintaining Backstage on Kubernetes. This article will describe how easy it is to get started with the Backstage Helm chart so that an instance of Backstage can be up and running on Kubernetes in no time.

Installing Helm

Helm is a versatile tool and has been integrated into a number of popular solutions as its adoption grows. However, the simplest way to demonstrate the use of the Backstage Helm chart is to utilize the standalone command line tool from a local machine. Download and install the Helm CLI from the Helm website using the method of your choosing for the target Operating System.

Once Helm has been installed, add the backstage Helm chart repository and its dependent repository using the following commands:

helm repo add bitnami https://charts.bitnami.com/bitnami
helm repo add backstage https://backstage.github.io/charts
note

The Backstage Helm chart is also available as an OCI artifact. However, the steps described in this article will focus on the installation from a Helm Chart repository. Instructions on how to leverage the chart from an OCI registry can be found on the chart GitHub project repository.

Deploying to Kubernetes

Several options are available for accessing a Kubernetes cluster, ranging from a managed cloud provider or running one locally. Let's start by using Minikube, a solution for running a Kubernetes cluster locally, as the target environment for deploying the Backstage Helm chart by first installing and configuring Minikube on the local machine based on the steps described on the Minikube website for the target Operating System.

Once Minikube has been installed and configured, start an instance by executing the following command:

minikube start
note

The Kubernetes CLI (kubectl) may be desired in order to perform commands against the minikube instance. By default, it is not installed when minikube is installed. Follow these steps to configure kubectl on the local machine.

Now that the minikube instance is up running, the next step is to deploy the Backstage Helm chart to Kubernetes. Regardless of the operating environment that is used for Backstage, there are a few configuration details that need to be specified, particularly the baseUrl that will be used to access the platform. Backstage configuration properties can be provided in several ways and the Backstage Helm chart (thanks to both Helm’s templating capabilities along with the ability to specify parameterized values) includes support for many of the most common types, including as environment variables, additional configuration files that are contained within ConfigMaps, and as inline configuration files that are transformed into ConfigMaps.

The most straightforward method for the purposes of this article is to define any configuration properties as environment variables which are then added as environment variables that are added to the Backstage container.

Following a similar pattern as described in the documentation related to deploying Backstage to Kubernetes, create a file called values-minikube-default.yaml with the following content:


backstage:
extraEnvVars:
- name: 'APP_CONFIG_app_baseUrl'
value: 'http://{{ .Values.ingress.host }}:7007'
- name: 'APP_CONFIG_backend_baseUrl'
value: 'http://{{ .Values.ingress.host }}:7007'
- name: 'APP_CONFIG_backend_cors_origin'
value: 'http://{{ .Values.ingress.host }}:7007`'

ingress:
enabled: false
host: localhost

Environment variables with the prefix APP_CONFIG are eligible to be interpreted by Backstage as configuration properties and any field underneath the extraEnvVars property will be added to the Backstage container. The full list of how Backstage configuration properties can be defined can be found here. Also note that by default, the Backstage Helm chart creates an Ingress resource to expose Backstage outside of the Kubernetes cluster. However, minikube does not contain an Ingress controller in its default state. To access Backstage, the port-forward capability of kubectl will be used.

Deploy Backstage to minikube by executing the following command including specifying the Values file created previously.

helm install -n backstage --create-namespace backstage backstage/backstage -f values-minikube-default.yaml

The preceding command deploys Backstage in a new namespace called backstage. Confirm the Backstage pod is running by executing the following command:

kubectl get pods -n backstage

Now, forward a local port to gain access to the Backstage service from the local machine:

kubectl port-forward -n backstage svc/backstage 7007:7007

Open a web browser and navigate to http://localhost:7007 to view the deployed instance of Backstage.

And just like that, after only a few steps, Backstage has been deployed to Kubernetes. Establishing an instance of Backstage within a Kubernetes environment is just the beginning of the journey towards achieving a robust developer platform within an organization. With the help of the Backstage Helm chart, realizing this goal becomes much more attainable.

· 3 min read
Tom Coufal

Not so long ago, Red Hat pledged its intention to join the Backstage community. Several weeks later we're starting to see the first fruits of the effort. The Janus community is pleased to announce the availability of the first 2 Backstage plugins created at Red Hat. These plugins target upstream community projects, namely Keycloak and Open Cluster Management. Both plugins are in the early stages of development and are not meant to be used yet in production environments, however we welcome any feedback and suggestions as they continue to mature. Please join us on our path to building a better Internal Developer Platforms for Kubernetes and OpenShift on the Janus IDP community website.

Details related to the first Keycloak and Multicluster Engine plugins for Backstage can be found in the following sections:

Keycloak plugin for Backstage

The need for Identity management is a common concern for any Internal Developer Platform. Backstage already contains the functionality to connect to external identity providers to enable authentication and apply proper RBAC. However, these concerns are not the sole role of identity management in relation to development portals. These portals also focus on accountability, responsibility and relationship of users and contributors to their project. Backstage achieves that through entity relations within a service catalog. All actors and objects are modeled as entities in this catalog and the Keycloak plugin ensures that all of your Keycloak users and groups are properly represented and mapped within the catalog. It allows the Backstage instance to interface with Keycloak directly and perform automatic and recurring importing of assets. Once imported, these user and group entities can be used in the standard Backstage catalog model with the added benefits of Keycloak’s diverse identity brokering capabilities.

MultiCluster Engine plugin for Backstage

One of the key focus areas for Backstage is the ability to provide a full, transparent service catalog to their developers. This includes mapping service dependencies on other components, resource ownership, and many more. Service dependencies should not include only the requirements of other services, but also model the underlying consumed resources. This plugin aims to provide a seamless, automated resource import for companies that use MulticlusterEngine from Open Cluster Management or Red Hat Advanced Cluster Management for Kubernetes (RHACM) for their cluster fleet management. By connecting the Backstage instance to the Hub cluster, all managed clusters are discovered and imported into Backstage as standard catalog resources. In addition, the plugin also provides frontend components that fetch data from the hub cluster through the Kubernetes plugin on the Backstage instance as a proxy allowing users to quickly observe the current status of each of their clusters and providing quick access to the OpenShift console.

What's Next?

We'll be investigating a way to import the managed clusters into the Backstage Kubernetes plugin configuration. This capability will enable Backstage users the ability to observe workloads on the managed clusters and further simplify Backstage catalog maintenance and integration with Kubernetes cluster fleets.